
Arduino Based Wireless Notice Board using Bluetooth and Android Application
- Ramesh G

- Oct 19, 2020
- 3 min read
Updated: Dec 29, 2022
The project based on HC-05 Bluetooth module which Controlling 16x2 LCD display using android application.

For Programmed ardunio Uno & Price:
https://www.dofbot.com/product-page/arduino-based-wireless-notice-board-using-bluetooth-android-app
The stuff you will need:
Breadboard.
HC-05 bluetooth module.
16x2 LCD display
I2c Module
Arduino UNO or Nano.
Some wires.
Mobile phone from Android.
That's all!
First, pin your LCD with I2C board on the breadboard and power the breadboard by connecting a wire from "5V" (Positive) on your Arduino to the positive row on the breadboard and another one from "GND" (ground or 0V) to the negative row.
Then connect the LCD to the I2C module and I2C to Arduino:
I2C SCL pin 4 - Arduino pin A5
I2C SDA pin 3 - Arduino pin A4
I2C GND pin 2 – 0V
I2C VCC pin 1 – 5V
Then connect the Tx(Transmit) pin on your Bluetooth module to the Rx (Receive) on the Arduino, and connect the Rx pin on your BT module to the Tx on the Arduino.
Finally, power the BT module by connecting the VCC (or 5V) to the positive row on the breadboard and connect the GND to the negative one on the breadboard.
Now open android app and goto Bluetooth setting and connect to Bluetooth is “ON” and select HC-05. Then simply write your text in L1 & L2 row in the app through mobile and press send text Button and text should be printed on the LCD.
Trouble shooting of Bluetooth issue:
Turn on the Bluetooth in your device.
Search for new device.
Click on Hc05 once it appear.
Enter the password "1234" or "0000".
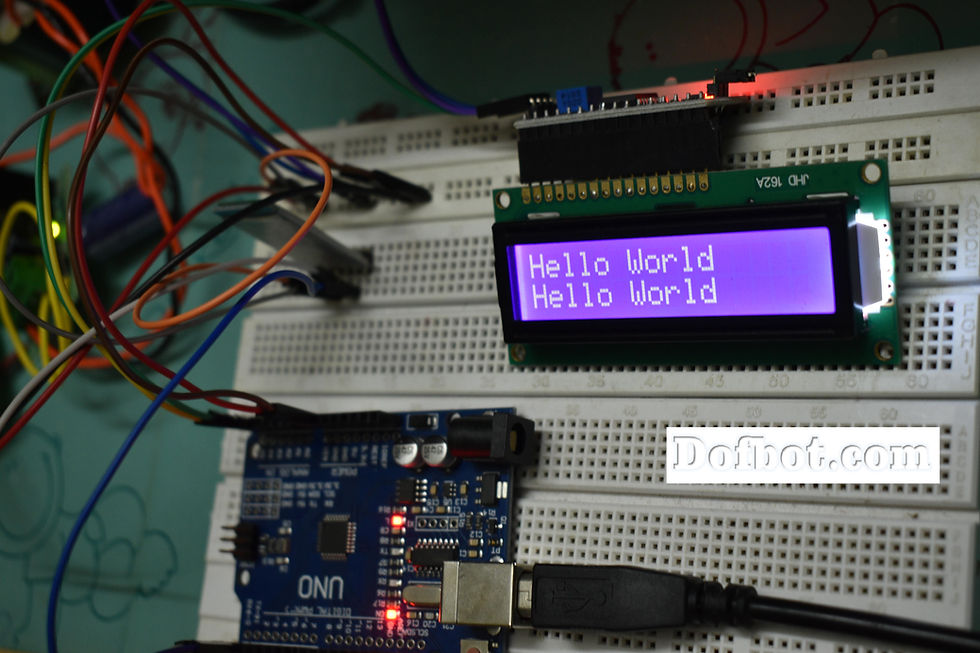
Step 1: To print text to the LCD, the LCD I2C address should be 0x27 or 0x3F.
Subscribe and Download code.
#include <LiquidCrystal_I2C.h>
LiquidCrystal_I2C lcd(0x27,16,2); // set the LCD address to 0x27 for a 16 chars and 2 line display
void setup()
{
lcd.init(); // initialize the lcd
// Print a message to the LCD.
lcd.backlight();
lcd.setCursor(0,0);
lcd.print("Hello world");
lcd.setCursor(0,1);
lcd.print("Hello World");
}
void loop()
{
}
Here the Final output
Download Code Here:
https://drive.google.com/drive/folders/1K4hHoZI1XtdjYtE2CEKEbkd3ubI7qSeZ?usp=sharing
Step 2: To print Scroll text to the LCD, the LCD I2C address should be 0x27 or 0x3F.
#include <LiquidCrystal_I2C.h>
// set the LCD number of columns and rows
int lcdColumns = 16;
int lcdRows = 2;
// set LCD address, number of columns and rows
// if you don't know your display address, run an I2C scanner sketch
LiquidCrystal_I2C lcd(0x27, lcdColumns, lcdRows);
String messageStatic = "Dofbot.com";
String messageToScroll = "arduino, IoT, NODEMCU Projects done here";
// Function to scroll text
// The function acepts the following arguments:
// row: row number where the text will be displayed
// message: message to scroll
// delayTime: delay between each character shifting
// lcdColumns: number of columns of your LCD
void scrollText(int row, String message, int delayTime, int lcdColumns) {
for (int i=0; i < lcdColumns; i++) {
message = " " + message;
}
message = message + " ";
for (int pos = 0; pos < message.length(); pos++) {
lcd.setCursor(0, row);
lcd.print(message.substring(pos, pos + lcdColumns));
delay(delayTime);
}
}
void setup(){
// initialize LCD
lcd.init();
// turn on LCD backlight
lcd.backlight();
}
void loop(){
// set cursor to first column, first row
lcd.setCursor(0, 0);
// print static message
lcd.print(messageStatic);
// print scrolling message
lcd.setCursor(0,1);
scrollText(1, messageToScroll, 250, lcdColumns);
}
Download Code Here:
https://drive.google.com/drive/folders/1x5YoJn3vOa88mDWWWzBrxO7l3yWAIzmO?usp=sharing
Step 3: To print text to the LCD using android app, the LCD I2C address should be 0x27 or 0x3F.
// Project by G Ramesh
// dofbotindia@gmail.com
// dofbot.com
#include <Wire.h>
#include <LiquidCrystal_I2C.h>
int lcdColumns = 16;
int lcdRows = 2;
LiquidCrystal_I2C lcd(0x27, lcdColumns, lcdRows);
char Display;
String Word;
String messageStatic;
String messageToScroll;
int L1;
int L2;
void scrollText(int row, String message, int delayTime, int lcdColumns) {
for (int i=0; i < lcdColumns; i++) {
message = " " + message;
}
message = message + " ";
for (int pos = 0; pos < message.length(); pos++) {
lcd.setCursor(0, row);
lcd.print(message.substring(pos, pos + lcdColumns));
delay(delayTime);
}
}
void setup()
{
lcd.init(); // initialize the lcd
// Print a message to the LCD.
lcd.backlight();
lcd.begin(16,2);// Columnas y filas de LCD
Serial.begin(9600);
}
void loop() {
if(Serial.available())
{
Display = Serial.read();
Word = Word + Display;
if (Display == '*') {
Serial.println(Word);
Serial.println();
L1 = Word.indexOf(',');
messageStatic = Word.substring(0, L1);
L2 = Word.indexOf(',', L1+1);
messageToScroll = Word.substring(L1+1, L2);
Serial.print("messageStatic");
Serial.println(messageStatic);
Serial.print("messageToScroll");
Serial.println(messageToScroll);
Word = "";
lcd.setCursor(0,0);
lcd.print(messageStatic);
lcd.setCursor(0,1);
lcd.print(messageStatic);
// lcd.setCursor(0,1);
// scrollText(1, messageToScroll, 250, lcdColumns);
}
}
}
Subscribe and Download code.
Here the Final output


Download Android App Here:

Wireless LCD application:
Updating New Menu list in Remote LCD.
The notice board is used to update with new information.
#where is my bot?
#Here is my bot! Good news!


Comments