
Home Automation ESP32 and TFT Touch Display
- Ramesh G

- Apr 15, 2023
- 6 min read
Updated: Sep 18, 2024

In this tutorial to learn the home automation project using ESP32, TFT 3.5 inch touch screen Display. Using this project is replacement for the manual switch and you can easily on/off the home appliances like Lights, Fans, AC, TV, etc. Here we used the 4 channel relay board for controlling the 4 devices.

Components:
ESP-32 Dev Module (38Pin) - 1 n0
3.5 inch TFT LCD Display Module SPI Interface 320x480 with Touch Screen- 1No
4 channel Relay Module- 1 no
Jumper Wires
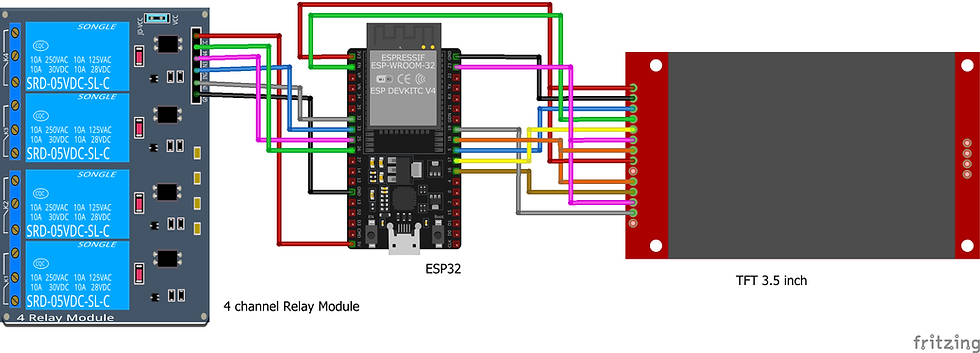
Circuit Diagram
3.5 inch TFT LCD Display Module SPI Interface 320x480 with Touch Screen
This TFT display is big bright and colorful! 480×320 pixels with individual RGB pixel control, this has way more resolution than a black and white 128×64 display.
As a bonus, this display has a resistive touch screen attached to it already, so you can detect finger presses anywhere on the screen. This display has a controller built into it with RAM buffering so that almost no work is done by the microcontroller.
This 3.5-inch SPI Touch Screen Module is wrapped up into an easy-to-use breakout board, with SPI connections on one end. If you’re going with SPI mode, you can also take advantage of the onboard MicroSD card socket to display images.
The 3.5-inch display doesn't have a built-in level shifter, so it's advised to use only 3.3v. Using a node MCU would be more suitable cause it provides only 3.3v. if you are using a 5v microcontroller like the Arduino UNO, MEGA, Using a level shifter would give you the appropriate voltage needed to operate the LCD without damaging it.
DATA SHEET Download
3.5 inch TFT LCD SPI Module Manual Download
Refer the blog for more deatils in TFT configuration.


ESP32 Development Board WiFi+Bluetooth 38 Pin
ESP32 Development board is based on the ESP WROOM32 WIFI + BLE Module.It’s a low-footprint, minimal system development board powered by the latest ESP-WROOM-32 module and can be easily inserted into a solderless breadboard. It contains the entire basic support circuitry for the ESP-WROOM-32, including the USB-UART bridge, reset- and boot-mode buttons, LDO regulator and a micro-USB connector. Every important GPIO is available to the developer.
ESP32 Development Board Feature: ESP32 is already integrated antenna and RF balun,power amplifier,low-noise amplifiers,filters,and power management module. This board is used with 2.4 GHz dual-mode Wi-Fi and Bluetooth chips by TSMC 40nm low power technology,power and RF properties best,which is safe,reliable,and scalable to a variety of applications. Strong function with support LWIP protocol,Freertos. Supporting three modes:AP,STA,and AP+STA. Supporting Lua program,easily to develop.
Installing the library
To install the library navigate to the Sketch > Include Library > Manage Libraries… Wait for Library Manager to download libraries index and update list of installed libraries.
Download TFT Library , we need to use this library for TFT touch display
In your Arduino IDE, to install the libraries go to Sketch > Include Library > Add .ZIP library… and select the library you’ve just downloaded.
After Arduino IDE installed, there is no package to support ESP32-S2, we need to install the ESP32 package in Arduino IDE to continue.
Select “File>Preferences>settings>Additional Boards Manager URLs” to fill the link: https://raw.githubusercontent.com/espressif/arduino-esp32/gh-pages/package_esp32_dev_index.json


arduino code
#include <FS.h>
#include "Free_Fonts.h" // Include the header file attached to this sketch
#include "dofbot.h"
#include <SPI.h>
#include <TFT_eSPI.h> // Hardware-specific library
#include <TFT_eWidget.h> // Widget library
TFT_eSPI tft = TFT_eSPI(); // Invoke custom library
#define CALIBRATION_FILE "/TouchCalData1"
#define REPEAT_CAL false
ButtonWidget btn1SW = ButtonWidget(&tft);
ButtonWidget btn2SW = ButtonWidget(&tft);
ButtonWidget btn3SW = ButtonWidget(&tft);
ButtonWidget btn4SW = ButtonWidget(&tft);
#define BUTTON_W 100
#define BUTTON_H 50
// Create an array of button instances to use in for() loops
// This is more useful where large numbers of buttons are employed
ButtonWidget* btn[] = {&btn1SW , &btn2SW , &btn3SW , &btn4SW};
uint8_t buttonCount = sizeof(btn) / sizeof(btn[0]);
// define the GPIO connected with Relays and switches
#define RelayPin1 33 //D33
#define RelayPin2 32 //D32
#define RelayPin3 25 //D25
#define RelayPin4 26 //D26
// Relay State
bool toggleState_1 = HIGH; //Define integer to remember the toggle state for relay 1
bool toggleState_2 = HIGH; //Define integer to remember the toggle state for relay 2
bool toggleState_3 = HIGH; //Define integer to remember the toggle state for relay 3
bool toggleState_4 = HIGH; //Define integer to remember the toggle state for relay 4
void btn1SW_pressAction(void)
{
if (btn1SW.justPressed()) {
btn1SW.drawSmoothButton(!btn1SW.getState(), 3, TFT_BLACK, btn1SW.getState() ? "OFF" : "ON");
Serial.print("Button toggled: ");
if (btn1SW.getState())
{Serial.println("ON");
digitalWrite(RelayPin1, HIGH);}
else { Serial.println("OFF");
digitalWrite(RelayPin1, LOW);
btn1SW.setPressTime(millis());}
}
// if button pressed for more than 1 sec...
if (millis() - btn1SW.getPressTime() >= 1000) {
Serial.println("Stop pressing my buttton.......");
}
else Serial.println("Right button is being pressed");
}
void btn1SW_releaseAction(void)
{
// Not action
}
void btn2SW_pressAction(void)
{
if (btn2SW.justPressed()) {
btn2SW.drawSmoothButton(!btn2SW.getState(), 3, TFT_BLACK, btn2SW.getState() ? "OFF" : "ON");
Serial.print("Button toggled: ");
if (btn2SW.getState())
{Serial.println("ON");
digitalWrite(RelayPin2, HIGH);}
else { Serial.println("OFF");
digitalWrite(RelayPin2, LOW);
btn2SW.setPressTime(millis());}
}
// if button pressed for more than 1 sec...
if (millis() - btn2SW.getPressTime() >= 1000) {
Serial.println("Stop pressing my buttton.......");
}
else Serial.println("Right button is being pressed");
}
void btn2SW_releaseAction(void)
{
// Not action
}
void btn3SW_pressAction(void)
{
if (btn3SW.justPressed()) {
btn3SW.drawSmoothButton(!btn3SW.getState(), 3, TFT_BLACK, btn3SW.getState() ? "OFF" : "ON");
Serial.print("Button toggled: ");
if (btn3SW.getState())
{Serial.println("ON");
digitalWrite(RelayPin3, HIGH);}
else { Serial.println("OFF");
digitalWrite(RelayPin3, LOW);
btn3SW.setPressTime(millis());}
}
// if button pressed for more than 1 sec...
if (millis() - btn3SW.getPressTime() >= 1000) {
Serial.println("Stop pressing my buttton.......");
}
else Serial.println("Right button is being pressed");
}
void btn3SW_releaseAction(void)
{
// Not action
}
void btn4SW_pressAction(void)
{
if (btn4SW.justPressed()) {
btn4SW.drawSmoothButton(!btn4SW.getState(), 3, TFT_BLACK, btn4SW.getState() ? "OFF" : "ON");
Serial.print("Button toggled: ");
if (btn4SW.getState())
{Serial.println("ON");
digitalWrite(RelayPin4, HIGH);}
else { Serial.println("OFF");
digitalWrite(RelayPin4, LOW);
btn4SW.setPressTime(millis());}
}
// if button pressed for more than 1 sec...
if (millis() - btn4SW.getPressTime() >= 1000) {
Serial.println("Stop pressing my buttton.......");
}
else Serial.println("Right button is being pressed");
}
void btn4SW_releaseAction(void)
{
// Not action
}
void initButtons() {
uint16_t x = 150;
uint16_t y = 85;
btn1SW.initButtonUL(x, y, BUTTON_W, BUTTON_H, TFT_BLACK, TFT_RED, TFT_GREEN, "OFF", 1);
btn1SW.setPressAction(btn1SW_pressAction);
btn1SW.setReleaseAction(btn1SW_releaseAction);
btn1SW.drawSmoothButton(false, 3, TFT_BLACK); // 3 is outline width, TFT_BLACK is the surrounding background colour for anti-aliasing
y = 160;
btn2SW.initButtonUL(x, y, BUTTON_W, BUTTON_H, TFT_BLACK, TFT_RED, TFT_GREEN, "OFF", 1);
btn2SW.setPressAction(btn2SW_pressAction);
//btn2SW.setReleaseAction(btn2SW_releaseAction);
btn2SW.drawSmoothButton(false, 3, TFT_BLACK); // 3 is outline width, TFT_BLACK is the surrounding background colour for anti-aliasing
y = 235;
btn3SW.initButtonUL(x, y, BUTTON_W, BUTTON_H, TFT_BLACK, TFT_RED, TFT_GREEN, "OFF", 1);
btn3SW.setPressAction(btn3SW_pressAction);
btn3SW.setReleaseAction(btn3SW_releaseAction);
btn3SW.drawSmoothButton(false, 3, TFT_BLACK); // 3 is outline width, TFT_BLACK is the surrounding background colour for anti-aliasing
y = 310;
btn4SW.initButtonUL(x, y, BUTTON_W, BUTTON_H, TFT_BLACK, TFT_RED, TFT_GREEN, "OFF", 1);
btn4SW.setPressAction(btn4SW_pressAction);
btn4SW.setReleaseAction(btn4SW_releaseAction);
btn4SW.drawSmoothButton(false, 3, TFT_BLACK); // 3 is outline width, TFT_BLACK is the surrounding background colour for anti-aliasing
}
void setup() {
Serial.begin(115200);
pinMode(RelayPin1, OUTPUT);
pinMode(RelayPin2, OUTPUT);
pinMode(RelayPin3, OUTPUT);
pinMode(RelayPin4, OUTPUT);
//During Starting all Relays should TURN OFF
digitalWrite(RelayPin1, !toggleState_1);
digitalWrite(RelayPin2, !toggleState_2);
digitalWrite(RelayPin3, !toggleState_3);
digitalWrite(RelayPin4, !toggleState_4);
tft.init();
tft.begin();
tft.setRotation(0);
tft.setSwapBytes(true);
tft.fillScreen(TFT_WHITE);
// tft.fillScreen(TFT_BLACK);
tft.setFreeFont(FF18);
// Calibrate the touch screen and retrieve the scaling factors
touch_calibrate();
initButtons();
tft.setTextColor(TFT_BLACK, TFT_WHITE);
//tft.setTextSize(1);
// tft.fillScreen(TFT_BLACK);
// tft.setSwapBytes(true);
tft.setCursor(1,30);
tft.println("HOME AUTOMATION ESP32");
tft.setCursor(15,55);
tft.println("& TFT TOUCH DISPLAY");
tft.setCursor(50,115);
tft.println("Relay1");
tft.setCursor(50,195);
tft.println("Relay2");
tft.setCursor(50,270);
tft.println("Relay3");
tft.setCursor(50,345);
tft.println("Relay4");
tft.setCursor(120,410);
tft.setTextSize(0.5);
tft.println("PROJECT BY ");
tft.setCursor(120,435);
tft.println("RAMESH G");
tft.setCursor(120,460);
tft.println("DOFBOT.COM");
}
void loop() {
static uint32_t scanTime = millis();
uint16_t t_x = 9999, t_y = 9999; // To store the touch coordinates
// Scan keys every 50ms at most
if (millis() - scanTime >= 50) {
// Pressed will be set true if there is a valid touch on the screen
bool pressed = tft.getTouch(&t_x, &t_y);
scanTime = millis();
for (uint8_t b = 0; b < buttonCount; b++) {
if (pressed) {
if (btn[b]->contains(t_x, t_y)) {
btn[b]->press(true);
btn[b]->pressAction();
}
}
else {
btn[b]->press(false);
btn[b]->releaseAction();
}
}
}
for(int i=0;i<frames;i++)
{
delay(40);
tft.pushImage(20,400,animation_width , animation_height, dofbot[i]);
}
tft.drawRect(20, 75,280, 302, TFT_BLACK);
// tft.setCursor(30,60);
// tft.print("Horizontal gradient");
}
void touch_calibrate()
{
uint16_t calData[5];
uint8_t calDataOK = 0;
// check file system exists
if (!SPIFFS.begin()) {
Serial.println("Formating file system");
SPIFFS.format();
SPIFFS.begin();
}
// check if calibration file exists and size is correct
if (SPIFFS.exists(CALIBRATION_FILE)) {
if (REPEAT_CAL)
{
// Delete if we want to re-calibrate
SPIFFS.remove(CALIBRATION_FILE);
}
else
{
File f = SPIFFS.open(CALIBRATION_FILE, "r");
if (f) {
if (f.readBytes((char *)calData, 14) == 14)
calDataOK = 1;
f.close();
}
}
}
if (calDataOK && !REPEAT_CAL) {
// calibration data valid
tft.setTouch(calData);
} else {
// data not valid so recalibrate
tft.fillScreen(TFT_BLACK);
tft.setCursor(20, 0);
tft.setTextFont(2);
tft.setTextSize(1);
tft.setTextColor(TFT_BLACK, TFT_WHITE);
tft.println("Touch corners as indicated");
tft.setTextFont(1);
tft.println();
if (REPEAT_CAL) {
tft.setTextColor(TFT_RED, TFT_BLACK);
tft.println("Set REPEAT_CAL to false to stop this running again!");
}
tft.calibrateTouch(calData, TFT_MAGENTA, TFT_BLACK, 15);
tft.setTextColor(TFT_GREEN, TFT_BLACK);
tft.println("Calibration complete!");
// store data
File f = SPIFFS.open(CALIBRATION_FILE, "w");
if (f) {
f.write((const unsigned char *)calData, 14);
f.close();
}
}
}
After a successful upload, open the Serial Monitor at a baud rate of 115200. Press the “EN/RST” button on the ESP32 board and see the result in serial monitor.
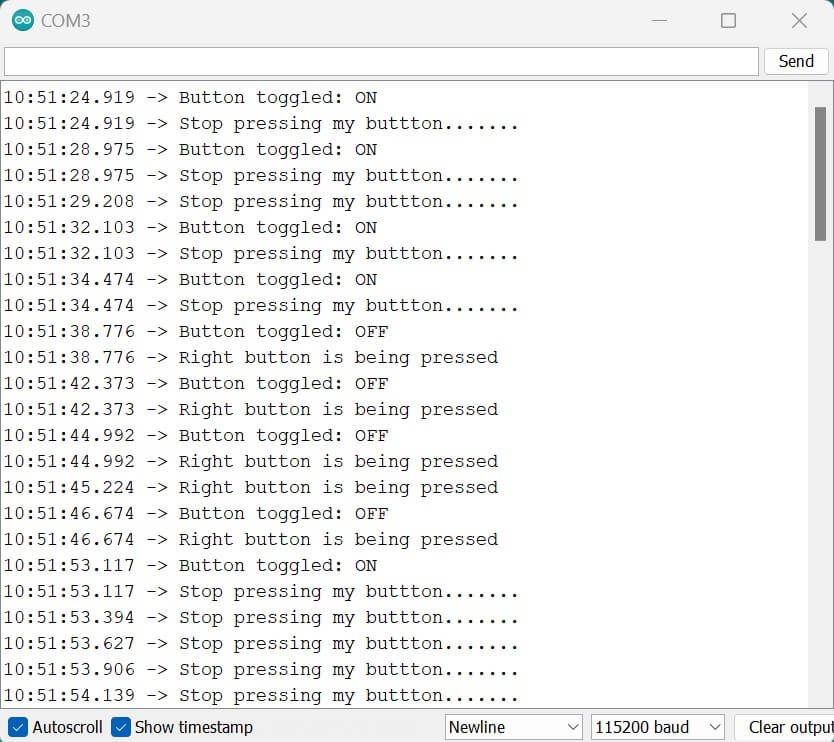
Demo:


Comments