
NodeMCU ESP8266 Web Server Control LED Brightness (PWM)
- Ramesh G

- Jan 10, 2021
- 3 min read
Here to build an ESP8266 NodeMCU web server with a slider to control the LED brightness. You’ll learn how to add a slider to your web server projects, get its value and save it in a variable that the ESP8266 can use. We’ll use that value to control the duty cycle of a PWM signal and change the brightness of an LED.
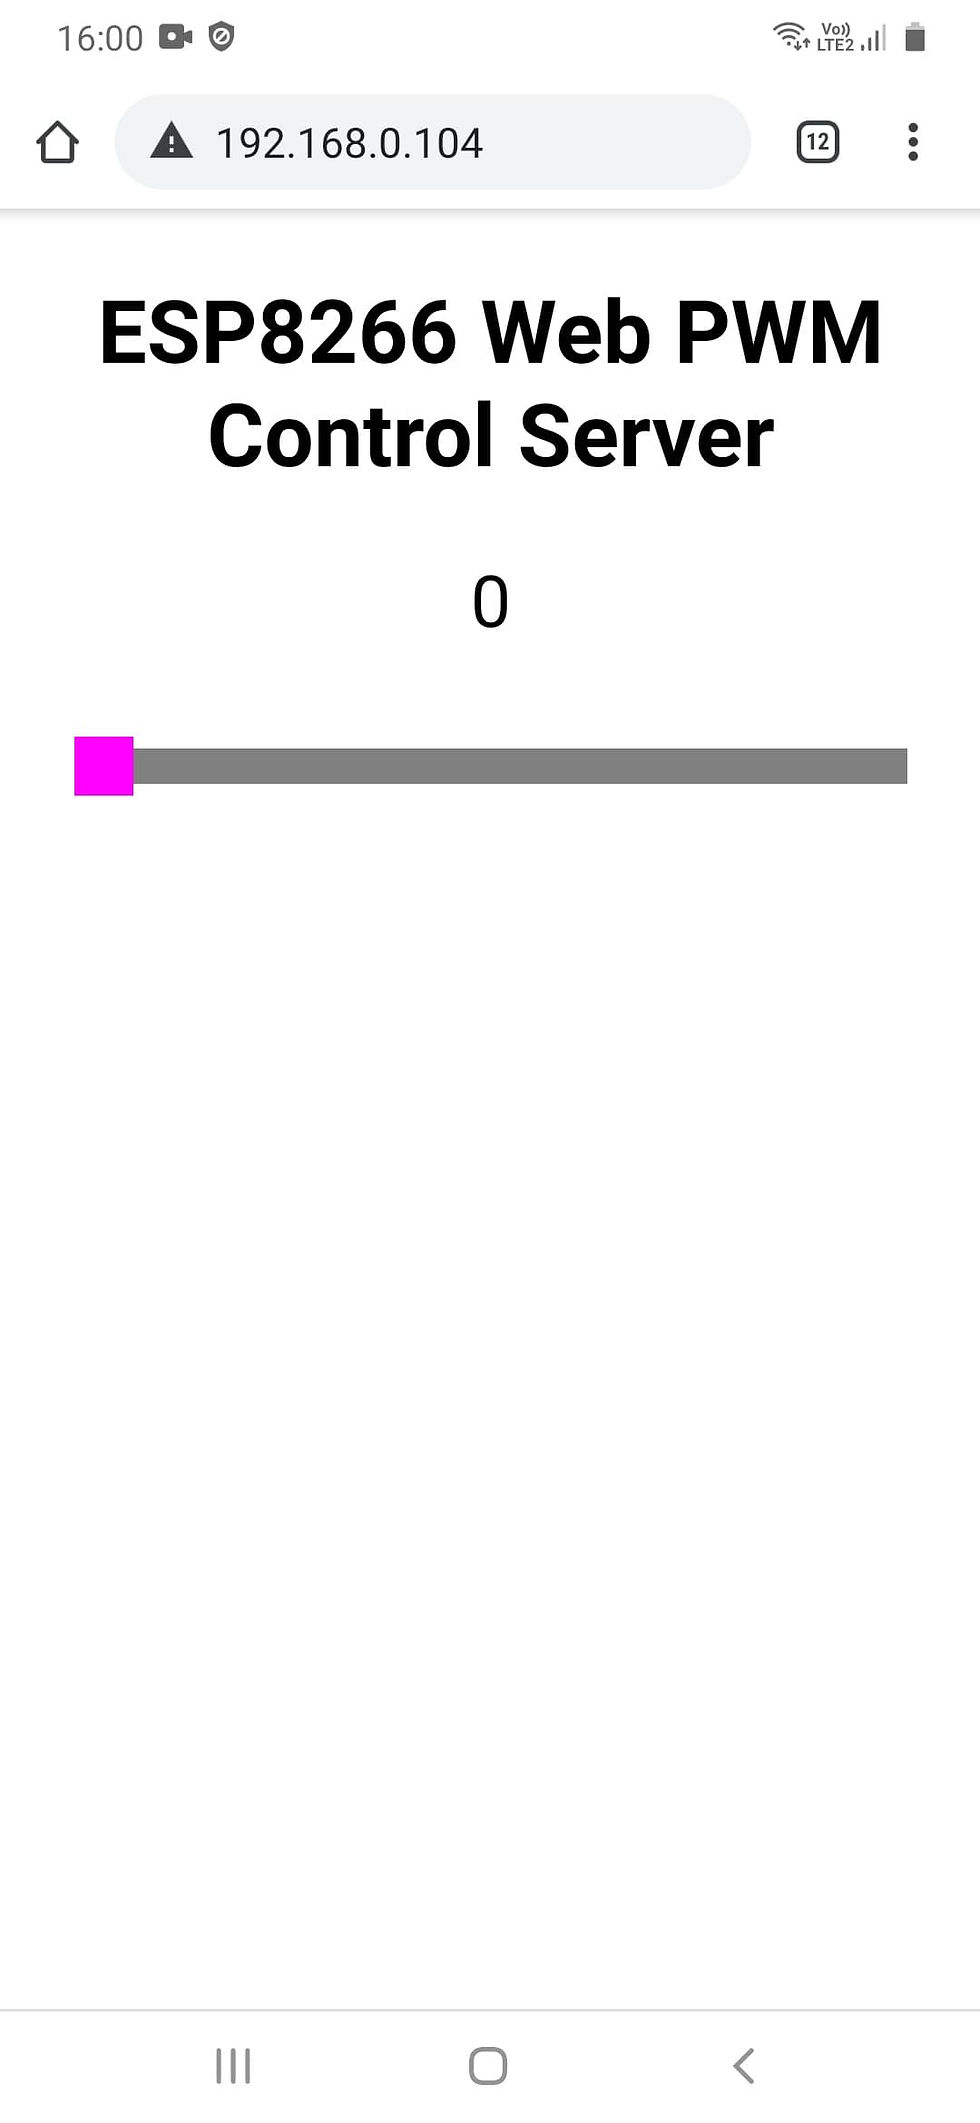
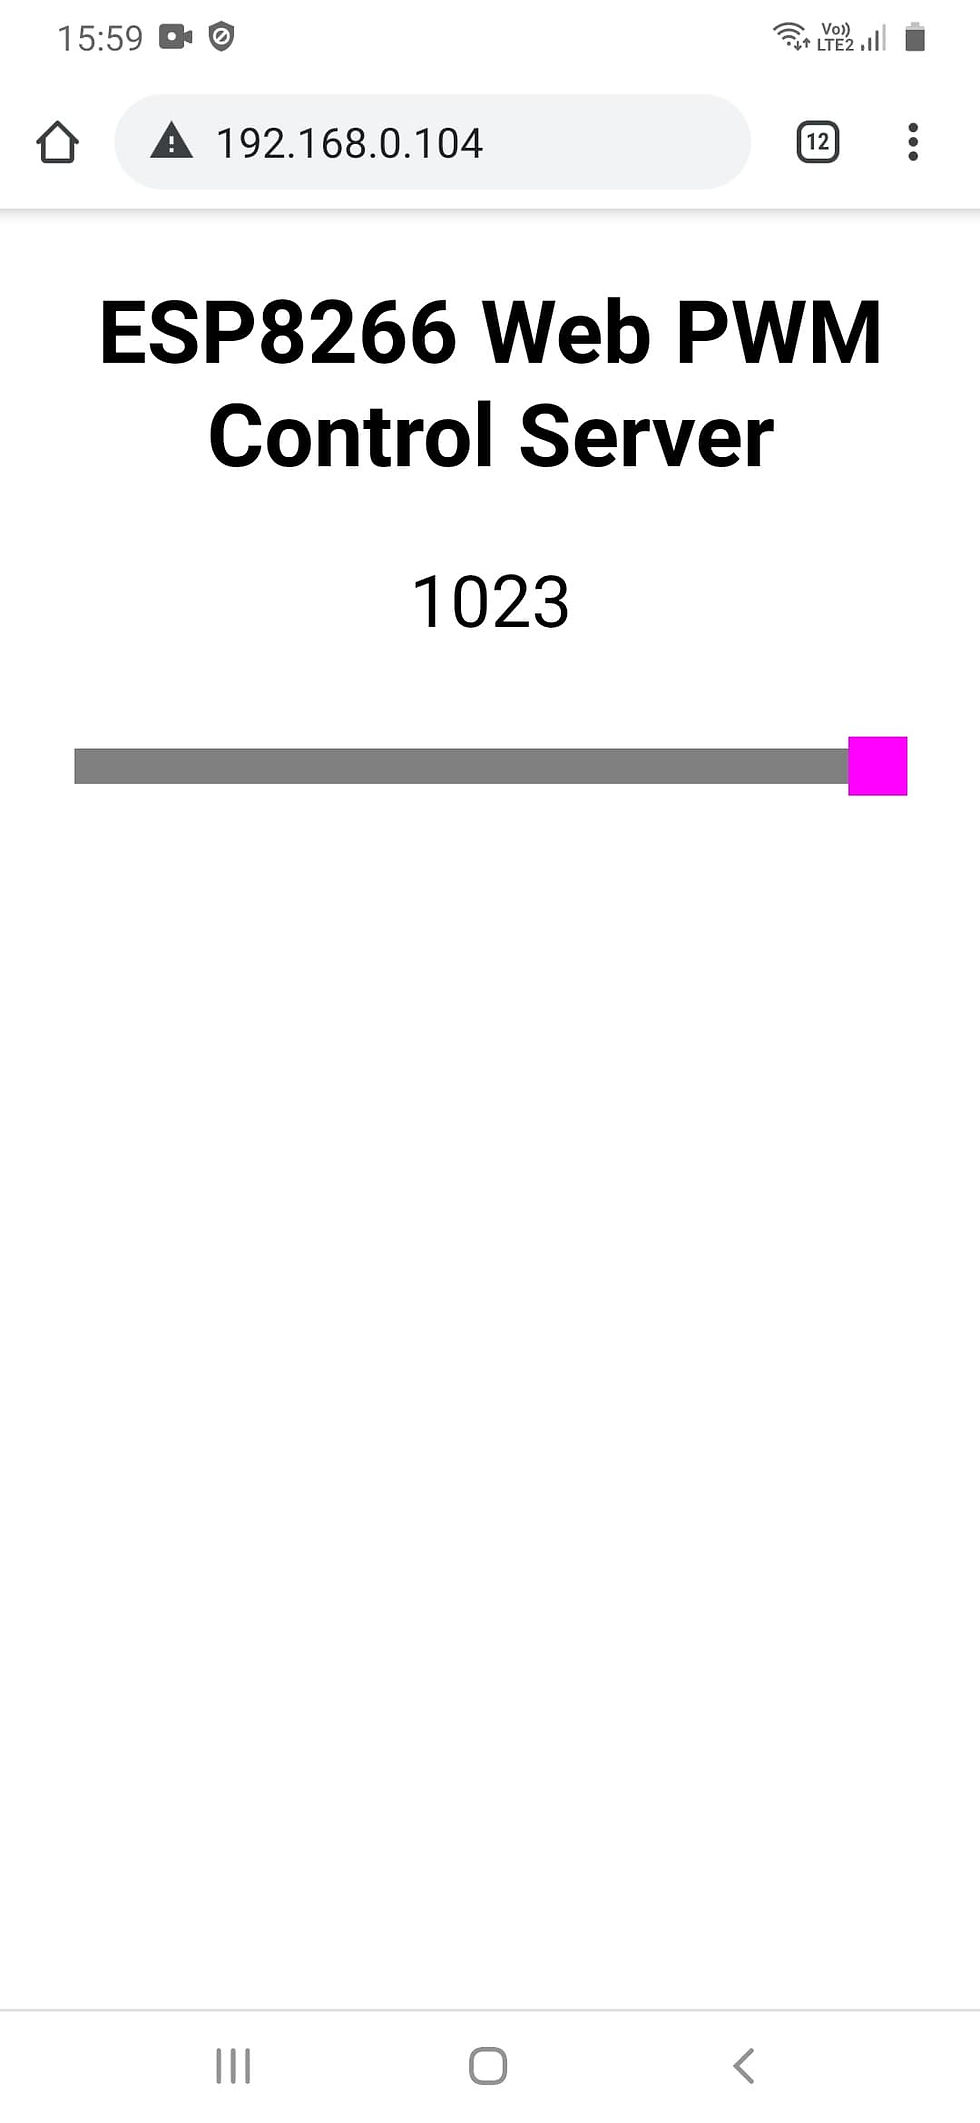
The ESP8266 hosts a web server that displays a web page with a slider;
When you move the slider, you make an HTTP request to the ESP8266 with the new slider value;
SLIDERVALUE is a number between 0 and 1023. You can modify your slider to include any other range;
From the HTTP request, the ESP8266 gets the current value of the slider;
The ESP8266 adjusts the PWM duty cycle accordingly to the slider value;
This can be useful to control the brightness of an LED (as we’ll do in this example), a servo motor, setting up a threshold value or other applications.
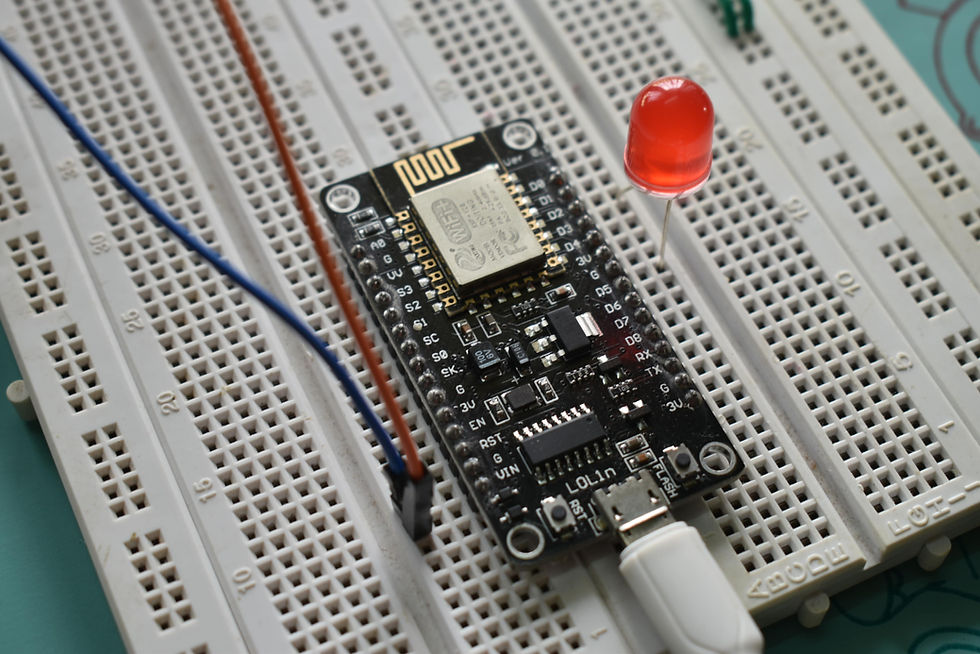
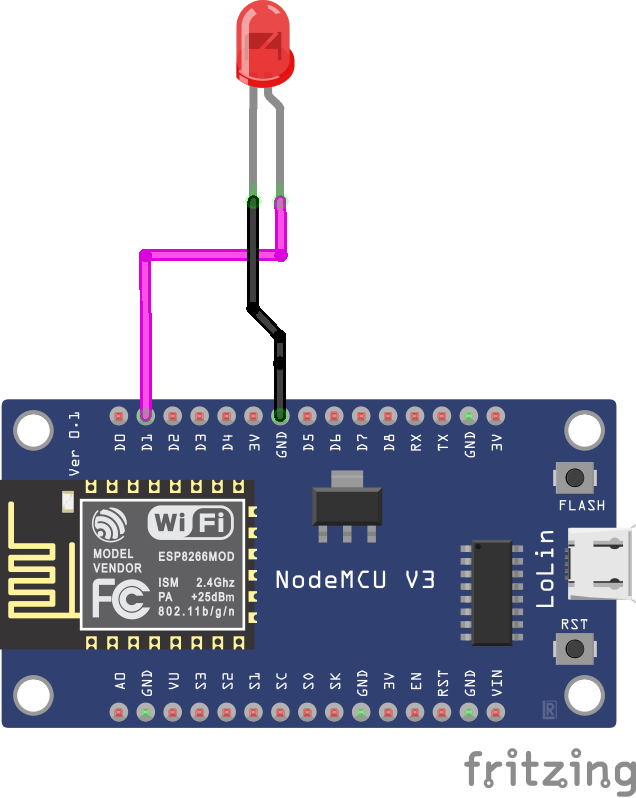
LED Connection with Node MCU.
GND -> ESP8266 GND pin;
Signal -> GPIO 5 (or any PWM pin).
Arduino IDE
We’ll program the ESP8266 NodeMCU board using Arduino IDE, so before proceeding with this tutorial, make sure you have the ESP8266 board installed in your Arduino IDE.
Async Web Server Libraries
We’ll build the web server using the following libraries:
These libraries aren’t available to install through the Arduino Library Manager, so you need to copy the library files to the Arduino Installation Libraries folder. Alternatively, in your Arduino IDE, you can go to Sketch > Include Library > Add .zip Library and select the libraries you’ve just downloaded.
Code
The following code controls the brightness of the ESP8266 built-in LED using a slider on a web server. In other words, you can change the PWM duty cycle with a slider. This can be useful to control the LED brightness or control a servo motor, for example.
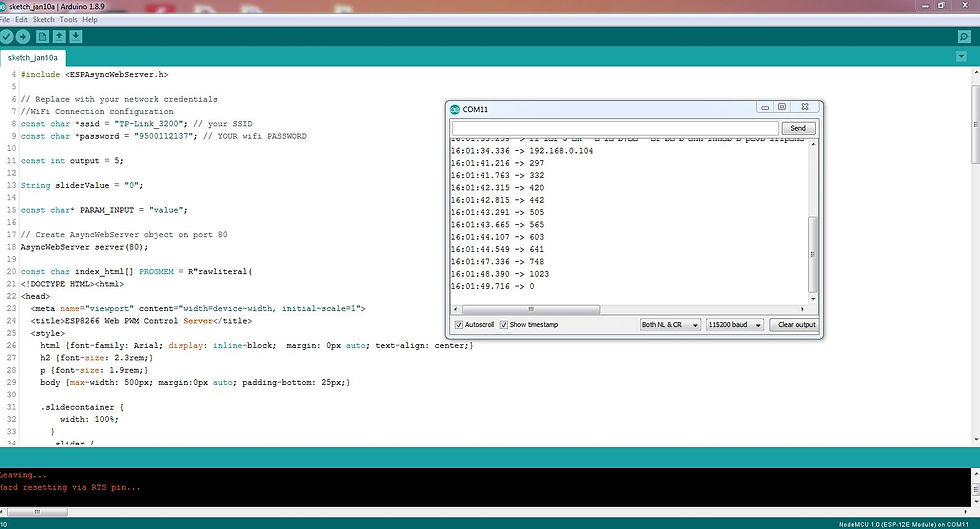
Copy the code to your Arduino IDE. Insert your network credentials and the code will work straight way.
#include <ESP8266WiFi.h>
#include <ESPAsyncTCP.h>
#include <ESPAsyncWebServer.h>
// Replace with your network credentials
//WiFi Connection configuration
const char *ssid = "SSID"; // your SSID
const char *password = "PW"; // YOUR wifi PASSWORD
const int output = 5;
String sliderValue = "0";
const char* PARAM_INPUT = "value";
// Create AsyncWebServer object on port 80
AsyncWebServer server(80);
const char index_html[] PROGMEM = R"rawliteral(
<!DOCTYPE HTML><html>
<head>
<meta name="viewport" content="width=device-width, initial-scale=1">
<title>ESP8266 Web PWM Control Server</title>
<style>
html {font-family: Arial; display: inline-block; margin: 0px auto; text-align: center;}
h2 {font-size: 2.3rem;}
p {font-size: 1.9rem;}
body {max-width: 500px; margin:0px auto; padding-bottom: 25px;}
.slidecontainer {
width: 100%;
}
.slider {
-webkit-appearance: none;
width: 350px;
height: 15px;
background: grey;
outline: none;
opacity: 0.5;
-webkit-transition: .2s;
transition: opacity .2s;
}
.slider:hover {
opacity: 2;
}
.slider::-webkit-slider-thumb {
-webkit-appearance: none;
appearance: none;
width: 25px;
height: 25px;
background: magenta;
cursor: pointer;
}
.slider::-moz-range-thumb {
width: 25px;
height: 25px;
background: #4CAF50;
cursor: pointer;
}
</style>
</head>
<body>
<h2>ESP8266 Web PWM Control Server</h2>
<p><span id="textSliderValue">%SLIDERVALUE%</span></p>
<p><input type="range" onchange="updateSliderPWM(this)" id="pwmSlider" min="0" max="1023" value="%SLIDERVALUE%" step="1" class="slider"></p>
<script>
function updateSliderPWM(element) {
var sliderValue = document.getElementById("pwmSlider").value;
document.getElementById("textSliderValue").innerHTML = sliderValue;
console.log(sliderValue);
var xhr = new XMLHttpRequest();
xhr.open("GET", "/slider?value="+sliderValue, true);
xhr.send();
}
</script>
</body>
</html>
)rawliteral";
// Replaces placeholder with button section in your web page
String processor(const String& var){
//Serial.println(var);
if (var == "SLIDERVALUE"){
return sliderValue;
}
return String();
}
void setup(){
// Serial port for debugging purposes
Serial.begin(115200);
analogWrite(output, sliderValue.toInt());
// Connect to Wi-Fi
WiFi.begin(ssid, password);
while (WiFi.status() != WL_CONNECTED) {
delay(1000);
Serial.println("Connecting to WiFi..");
}
// Print ESP Local IP Address
Serial.println(WiFi.localIP());
// Route for root / web page
server.on("/", HTTP_GET, [](AsyncWebServerRequest *request){
request->send_P(200, "text/html", index_html, processor);
});
// Send a GET request to <ESP_IP>/slider?value=<inputMessage>
server.on("/slider", HTTP_GET, [] (AsyncWebServerRequest *request) {
String inputMessage;
// GET input1 value on <ESP_IP>/slider?value=<inputMessage>
if (request->hasParam(PARAM_INPUT)) {
inputMessage = request->getParam(PARAM_INPUT)->value();
sliderValue = inputMessage;
analogWrite(output, sliderValue.toInt());
}
else {
inputMessage = "No message sent";
}
Serial.println(inputMessage);
request->send(200, "text/plain", "OK");
});
// Start server
server.begin();
}
void loop() {
}
Upload the Code
Now, upload the code to your ESP8266. Make sure you have the right board and COM port selected.
After uploading, open the Serial Monitor at a baud rate of 115200. Press the ESP8266 reset button. The ESP8266 IP address should be printed in the serial monitor.


Comments