
Angle Measure using MPU 6050 3-Axis Accelerometer and Gyroscope Sensor
- Ramesh G

- Aug 8, 2021
- 3 min read
Updated: Jun 21, 2024

In this tutorial, Measuring the angle (Object Position) using MPU6050 sensor, Bluetooth HC-05 device for wireless monitor using android application.The MPU6050 sensor module has a built-in gyroscope and an accelerometer sensor. The gyroscope is used to determine the orientation and the accelerometer provides information about the angle, such as X, Y, and Z-axis data. These information send through serial port connected with bluetooth device and send to android mobile application.
The android application provide corresponding X,Y,Z values in circular bar format on screen.
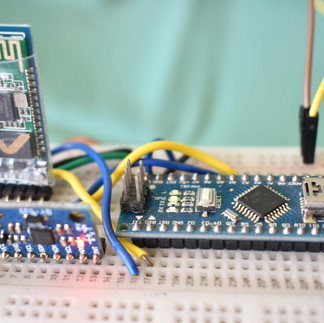
Circuit diagram

Components Required
MPU6050 Accelerometer - 1 no
Arduino Nano - 1 no
Bluetooth module HC-05 - 1no


Bluetooth HC-05 Module
HC-05 is a Bluetooth module which is designed for wireless communication. This module can be used in a master or slave configuration. Bluetooth serial modules allow all serial enabled devices to communicate with each other using Bluetooth.
It has 6 pins,
Key/EN- NC
VCC to Connect 5 V power
GND to power Ground
TXD to Arduino Nano Rx (D0)
RXD to Arduino Nano Tx (D1)
State- NC
HC-05 module Information
HC-05 has red LED which indicates connection status, whether the Bluetooth is connected or not. Before connecting to HC-05 module this red LED blinks continuously in a periodic manner. When it gets connected to any other Bluetooth device, its blinking slows down to two seconds.
This module works on 3.3 V. We can connect 5V supply voltage as well since the module has on board 5 to 3.3 V regulator.
As HC-05 Bluetooth module has 3.3 V level for RX/TX and microcontroller can detect 3.3 V level, so, no need to shift transmit level of HC-05 module. But we need to shift the transmit voltage level from microcontroller to RX of HC-05 module.
HC-05 Default Settings
Default Bluetooth Name: “HC-05”
Default Password: 1234 or 0000
Download Datasheet
MPU6050 Sensor
The MPU6050 devices combine a 3-axis gyroscope and a 3-axis accelerometer on the same silicon together with an onboard Digital Motion Processor (DMP) capable of processing complex 9-axis MotionFusion algorithms. Also, it has additional feature of on-chip Temperature sensor. It has I2C bus interface to communicate with the microcontrollers. A micro-electro-mechanical system (MEMS) is used to measure velocity, acceleration, orientation, displacement, and many other motion-related parameters.
Refer blog for more detail :https://www.dofbot.com/post/iot-based-object-angle-measure-using-mpu-6050-and-blynk
Calculations
Note that gyroscope and accelerometer sensor data of MPU6050 module consists of 16-bit raw data in 2’s complement form.
Temperature sensor data of MPU6050 module consists of 16-bit data (not in 2’s complement form).
Now suppose we have selected,
- Accelerometer full scale range of +/- 2g with Sensitivity Scale Factor of 16,384 LSB(Count)/g.
- Gyroscope full scale range of +/- 250 °/s with Sensitivity Scale Factor of 131 LSB (Count)/°/s.
then,
To get sensor raw data, we need to first perform 2’s complement on sensor data of Accelerometer and gyroscope.
After getting sensor raw data we can calculate acceleration and angular velocity by dividing sensor raw data with their sensitivity scale factor as follows,
Accelerometer values in g (g force)
Acceleration along the X axis = (Accelerometer X axis raw data/16384) g.
Acceleration along the Y axis = (Accelerometer Y axis raw data/16384) g.
Acceleration along the Z axis = (Accelerometer Z axis raw data/16384) g.
Gyroscope values in °/s (degree per second)
Angular velocity along the X axis = (Gyroscope X axis raw data/131) °/s.
Angular velocity along the Y axis = (Gyroscope Y axis raw data/131) °/s.
Angular velocity along the Z axis = (Gyroscope Z axis raw data/131) °/s.
For example,
Suppose, after 2’ complement we get accelerometer X axes raw value = +15454
Then Ax = +15454/16384 = 0.94 g.
Installing the Arduino Library
No need any special libraries.
Arduino Code
#include<Wire.h>
const int MPU_addr=0x68;
int16_t AcX,AcY,AcZ,Tmp,GyX,GyY,GyZ;
// remove wiring from bluetooth while uploading program
int minVal=265;
int maxVal=402;
double x;
double y;
double z;
void setup(){
Wire.begin();
Wire.beginTransmission(MPU_addr);
Wire.write(0x6B);
Wire.write(0);
Wire.endTransmission(true);
Serial.begin(9600);
}
void loop(){
Wire.beginTransmission(MPU_addr);
Wire.write(0x3B);
Wire.endTransmission(false);
Wire.requestFrom(MPU_addr,14,true);
AcX=Wire.read()<<8|Wire.read();
AcY=Wire.read()<<8|Wire.read();
AcZ=Wire.read()<<8|Wire.read();
int xAng = map(AcX,minVal,maxVal,-90,90);
int yAng = map(AcY,minVal,maxVal,-90,90);
int zAng = map(AcZ,minVal,maxVal,-90,90);
x= RAD_TO_DEG * (atan2(-yAng, -zAng)+PI);
y= RAD_TO_DEG * (atan2(-xAng, -zAng)+PI);
z= RAD_TO_DEG * (atan2(-yAng, -xAng)+PI);
Serial.print(x);
Serial.print("|");
Serial.print(y);
Serial.print("|");
Serial.print(z);
Serial.print("\n");
delay(500);
}
Serial monitor
After a successful upload, open the Serial Monitor at a baud rate of 9600. see the result on
Serial monitor.

Android application
First open Mobile application and select Bluetooth image button, after that select Bluetooth HC-05 device to connect and enter Password as mentioned above (0000 or 1234).
Subscribe and Download code.


MIT BLOCK
MIT app inventor Block image for android application development.


hi! the update part came from where?
Hello! Thank you for posting. Can you also share the .aia file exported from MIT App Inventor? Much appreciated.