
APDS-9960 Gesture, Proximity, RGB color sensor module interface with Voice
- Ramesh G

- Apr 23, 2022
- 4 min read

In this tutorial we will learn How to Use APDS9960 Gesture Sensor with Arduino nano and to display gesture hand directions, Proximity value and RGB color range on the LCD Display. In addition to that Voice announcement using DFPlayer mini for Gesture direction.
Proximity sensing range from 0 to 255.
Example: 0 - Very close
255 - Far
RGB color sensing range 0 to 4097 as per Arduino APDS 9960 library.
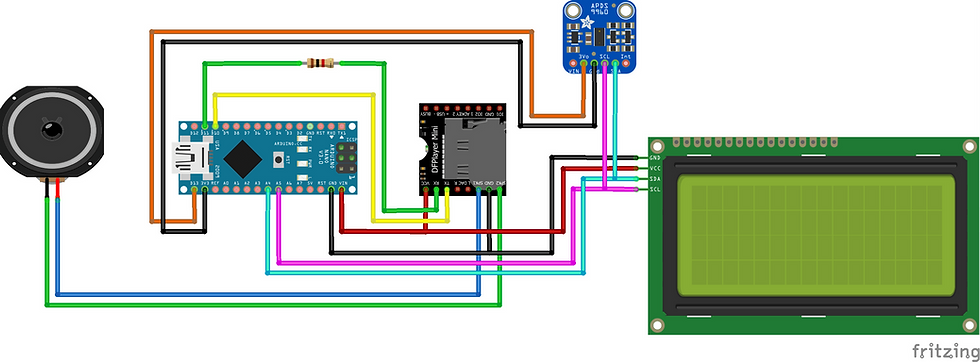
Circuit diagram
Components Required
Arduino Nano - 1 no
APDS-9960 Gesture- 1no
DFPlayer Mini - 1 no
Memory card 16gb- 1 no
Resistor 1k - 1 no

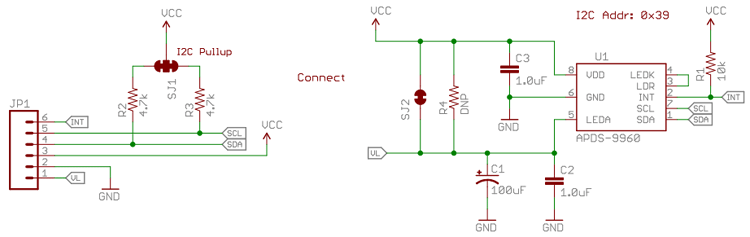
APDS-9960

The APDS-9960 is a multipurpose sensor that can be used for Ambient Light, RGB Sensing, Proximity Sensing, and Gesture Detection. It has been used in Samsung’s Galaxy S5 earlier and is used in many mobile phones as a proximity sensor. It is also used in gesture robotics because of its advanced gesture detection technique enabling it to detect the gesture very accurately and with a very high speed.
Pin Number Pin Name Description
1 VL Optional power to the IR LED if the PS jumper is not
connected. Can be 3.0V to 4.5V.
2 GND Connected to the ground of the circuit used.
3 VCC Power supply to the board. Can be 2.4V to 3.6V.
4 SDA I2C Serial Data Address pin. Used to transfer the data
through I2C.
5 SCL I2C Serial Clock Line pin. Provides clock pulse for
I2C communication.
6 INT External Interrupt pin. It is Active LOW during interrupt event.
APDS-9960 Features
Ambient Light and RGB Sensing, Proximity Sensing, and Advance Gesture Detection.
Operating Voltage: 2.4V to 3.6V.
Operating current: 0.2mA.
Communication protocol: 400KHz
Highly sensitive Ambient and RGB sensing through UV and IR blocking filters.
For gesture sensing there are four photodiodes, which are sensitive to different to next directions so that it can detect complex gestures easily.
The APDS9960 is used in many places. We can use it for gesture detection, ambient and RGB light sensing, proximity sensing etc. It can be used to give the RGB ratings of the light, because many times we need a particular RGB rated light, so that can be manipulated accordingly. It is used in many phones to disable the screen while someone is dialing the phone and keeping it on ear.
The sensor uses I2C communication protocol so that makes it super easy to use with microcontrollers. It operates on voltage range of 2.4V-3.6V (Typically 3.3V) and consumes really small current of 0.2mA so it is a power efficient sensor. The sensor gives the RGB values directly so you don’t need to do any calculations to fetch them.
Hardware of this sensor module is very simple. APDS9960 sensor is the main component for this board. As the board operates on 3.3V so a voltage regulator is used. The sensor has four photodiodes to detect the gestures. Whenever a gesture is performed, the IR signal transmitted by the LED gets reflected by the obstacle and is detected by the photodiodes and then the information is received about velocity and distance. This is how a gesture is detected. For RGB color sensing it has different channels for each kind of light red, blue, green and clear. And each channel has IR and UV blocking filters and a data converter which produces 16-bit data for each channel. This sensing can be used to calculate color temperature and can also be used to manipulate the backlight of displays. The interrupt is used to control the detect function. So it triggers the sensor to release the IR or detect it according to the interrupt.
There are two jumpers PS and I2C PU. These both jumpers are soldered by default. The PS jumper connects the power of the board to the power supply of the sensor. So if it is closed then we need to connect the VCC pin only to power the board as well as sensor. And if it is open then we need to provide the power to the board by VCC pin (2.4V to 3.6V) and to sensor by VL pin (3.0V to 4.5V).
The I2C PU jumper connects the pull up resistors to SDA and SCL lines. By default it is soldered. If you wish to not use these pull up resistors then you need to de-solder it and open it.
Applications
Used in gesture robotics, LCD displays for manipulation of backlight.
Used in cell phones as proximity sensor.
Mechanical switch replacement.
Can be used in RGB monitor.
APDS-9960 module Datasheet

Installing Library
To install the library navigate to the Sketch > Include Library > Manage Libraries… Wait for Library Manager to download libraries index and update list of installed libraries.
Arduino_APDS9960.h : you need to Download and install the Gesture library.
DFRobotDFPlayerMini.h : you need to Download and install the MP3 player library.
LiquidCrystal_I2C.h : you need to Download and install the LCD display library.
After installing the required libraries, copy the following code to your Arduino IDE.


Arduino code
#include <Arduino_APDS9960.h>
#include <LiquidCrystal_I2C.h>
LiquidCrystal_I2C lcd(0x27,20,4); // set the LCD address to 0x27 for a 20 chars and 4 line display
#include "Arduino.h"
#include "SoftwareSerial.h"
#include "DFRobotDFPlayerMini.h"
SoftwareSerial mySoftwareSerial(10, 11); // RX, TX
DFRobotDFPlayerMini myDFPlayer;
void printDetail(uint8_t type, int value);
void setup() {
mySoftwareSerial.begin(9600);
Serial.begin(9600);
while (!Serial); // Wait for Serial Monitor to open
if (!APDS.begin()) {
Serial.println("Error initializing APDS-9960 sensor.");
while (true); // Stop forever
}
lcd.init(); // initialize the lcd
// Print a message to the LCD.
lcd.backlight();
lcd.clear();
lcd.setCursor(6,0);
lcd.print("APDS-9960");
lcd.setCursor(0,1);
lcd.print("GESTURE: ");
lcd.setCursor(0,2);
lcd.print("PROXIMITY: ");
lcd.setCursor(0,3);
lcd.print("RGB: ");
if (!myDFPlayer.begin(mySoftwareSerial, false)) { //Use softwareSerial to communicate with mp3.
Serial.println(F("Unable to begin:"));
Serial.println(F("1.Please recheck the connection!"));
Serial.println(F("2.Please insert the SD card!"));
while(true){
delay(0); // Code to compatible with ESP8266 watch dog.
}
}
Serial.println(F("DFPlayer Mini online."));
myDFPlayer.volume(30); //Set volume value. From 0 to 30
myDFPlayer.play(5); //Play the 005.mp3
}
int proximity = 0;
int r = 0, g = 0, b = 0;
unsigned long lastUpdate = 0;
void loop() {
// Check if a proximity reading is available.
if (APDS.proximityAvailable()) {
proximity = APDS.readProximity();
}
// Check if a gesture reading is available
if (APDS.gestureAvailable()) {
int gesture = APDS.readGesture();
switch (gesture) {
case GESTURE_UP:
Serial.println("Detected UP gesture");
lcd.setCursor(9,1);
lcd.print("UP ");
myDFPlayer.play(2); //Play the 002.mp3
delay(3000);
break;
case GESTURE_DOWN:
Serial.println("Detected DOWN gesture");
lcd.setCursor(9,1);
lcd.print("DOWN ");
myDFPlayer.play(1); //Play the 001.mp3
delay(3000);
break;
case GESTURE_LEFT:
Serial.println("Detected LEFT gesture");
lcd.setCursor(9,1);
lcd.print("LEFT ");
myDFPlayer.play(3); //Play the 003.mp3
delay(3000);
break;
case GESTURE_RIGHT:
Serial.println("Detected RIGHT gesture");
lcd.setCursor(9,1);
lcd.print("RIGHT ");
myDFPlayer.play(4); //Play 004.mp3
delay(3000);
break;
default:
// Ignore
break;
}
}
// Check if a color reading is available
if (APDS.colorAvailable()) {
APDS.readColor(r, g, b);
}
// Print updates every 100 ms
if (millis() - lastUpdate > 500) {
lastUpdate = millis();
lcd.setCursor(11,2);
lcd.print(proximity);
lcd.setCursor(5,3);
lcd.print(r);
lcd.print(",");
lcd.print(g);
lcd.print(",");
lcd.print(b);
lcd.print(" ");
}
}
Demo


Comments