
Arduino Controlled Motion Camera using PIR Sensor
- Ramesh G

- Nov 17, 2020
- 3 min read
Updated: Dec 29, 2022
A camera that is positioned on a wall between two rooms, however, you can only see one room at a time unless you log into the camera software to rotate it manually. If someone were to walk into the opposite room, the camera would never record the action. To solve this, to create a motion detecting/tracking base on which I could attach the camera so it would automatically reposition itself to wherever the motion was detected. So let's start building this Arduino Security Motion Camera.
Circuit Diagram:

Components:
Arduino Uno - 1 no
HC-SR501 PIR Motion sensor- 6 nos
Servo Motor MG995 -1 no
Power supply DC 5V, 9V- 1 no
For Programmed ardunio Uno & Price:
Explanation:
The PIR motion sensor is ideal to detect movement. PIR stand for “Passive Infrared”. Basically, the PIR motion sensor measures infrared light from objects in its field of view.
So, it can detect motion based on changes in infrared light in the environment. It is ideal to detect if a human has moved in or out of the sensor range.
The sensor in the figure above has two built-in potentiometers to adjust the delay time (the potentiometer at the left) and the sensitivity (the potentiometer at the right).

Wiring the PIR motion sensor to an Arduino is pretty straightforward – the sensor has only 3 pins.
GND – connect to ground
OUT – connect to an Arduino digital pin
5V – connect to 5V
This Arduino Security Camera uses 5 PIR motion sensors to detect any movement within a 180º radius. Once motion is detected, a servo motor rotates the camera base to point in that direction. There are also 5 LED "status" lights positioned inside the base that will light up anytime one of the PIR sensors detects motion.
The servo motor is attached to the stand where the camera sits, and rotates the camera to align with the active PIR sensor. Using the pinout for your motor, connect one pin to power, another pin to the Arduino digital input 10, and the last pin to ground.
One thing to note about servo motors is that not all have a full 180º range of motion. So modify the code accordingly if your motor differs. You'll know the motor is trying to move too far when it makes a grinding noise at the last PIR sensor position.
You can follow the below images to cut out and assemble your cardboard base for the Arduino Security Camera.

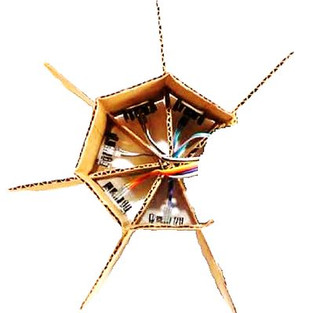


Here's what everything looks like after the PIR sensors have been installed and all the circuitry completed. Each of the five sections has a PIR motion sensor.
L bracket is Connected to the servo motor and Camera. In this we are used for carton material for the demo purpose
Program Code:
// Motion tracker
#include <Servo.h>
Servo CameraServo;
int currentPIRposition = 0; // set current angle of servo
// PIR sensors
int PIRpin[] = {2,3,4,5,6}; // PIR pin numbers
int currentPIRpin = 2; // the current PIR pin; begin with the first in the sequence above
int PIRprevState[] = {1,1,1,1,1}; // the previous state of the PIR (0 = LOW, 1 = HIGH)
int PIRposition[] = {157,117.75,78.5,39.25,0}; // assign angles for servo motor (0-157 distributed equally between 5 PIR sensors)
boolean PIRstatus; // Set status of PIR sensor as either true or false
void setup() {
Serial.begin(9600);
CameraServo.attach(7);
for (int p = 0; p < 5; p++) { // set all PIR sensors as INPUTS
pinMode(PIRpin[p], INPUT);
}
Serial.print("Calibrating PIR Sensors ");
for(int c = 0; c < 15; c++){ // calibrate PIR sensors for 15 seconds (change from 10-60 sec depending on your sensors)
Serial.print(".");
delay(1000);
}
Serial.println("PIR Sensors Ready");
CameraServo.write(78.5); // move the servo to the center position to begin
}
void loop() {
for (int PIR = 0; PIR < 5; PIR++) { // start this loop for each PIR sensor
currentPIRpin = PIRpin[PIR]; // set current PIR pin to current number in 'for' loop
PIRstatus = digitalRead(currentPIRpin);
if (PIRstatus == HIGH) { // if motion is detected on current PIR sensor
digitalWrite(currentLEDpin, HIGH); // turn corresponding LED on
if(PIRprevState[PIR] == 0) { // if PIR sensor's previous state is LOW
if (currentPIRposition != currentPIRpin && PIRprevState[PIR] == 0) { // if high PIR is different than current position PIR then move to new position
CameraServo.write(PIRposition[PIR]);
Serial.print("Current angle : ");
Serial.println(PIRposition[PIR]);
delay(50);
currentPIRposition = currentPIRpin; // reset current PIR position to active [PIR] pin
PIRprevState[PIR] = 1; // set previous PIR state to HIGH
}
PIRprevState[PIR] = 1; // set previous PIR state to HIGH if the current position is the same as the current PIR pin
}
}
else {
PIRprevState[PIR] = 0; // set previous PIR state to LOW
}
}
}


Impressed with the precision and professionalism displayed by the Locksmith Myrtle Beach company during the installation of the controlled motion camera. The attention to detail and expertise shown in positioning the camera ensures optimal coverage and security for our property.