
ESP8266 NodeMCU ADC with Pot Interface, Fusion chart and OLED
- Ramesh G

- Oct 15, 2022
- 4 min read
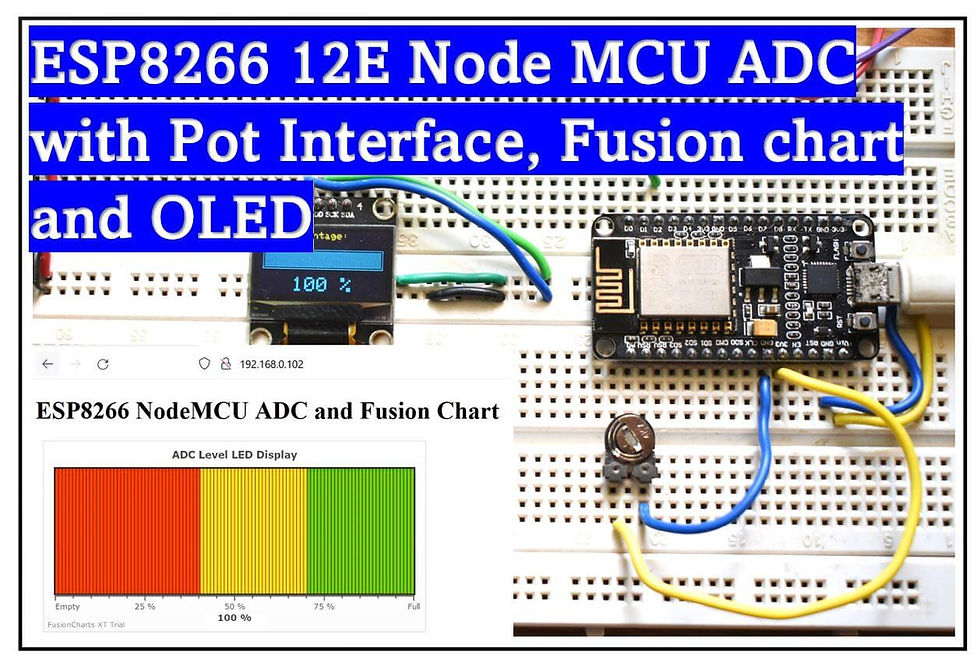
In this tutorial, we will learn how to use the ADC pin of the ESP8266 12E and interfacing a potentiometer with an analog input pin of ESP8266 ADC and read voltage across the potentiometer. ESP8266 12E ADC Resolution has a 10-bit, which means you'll get values range 0 and 1023. ESP8266 12E ADC will convert this analog signal into a digital value range from 0 to 1023 and mapped 0 to 100. The measured values send to the Web server and feed in to fusion chart value and also display it on the 0.96 OLED display. Here note that the voltage not exceeded the 3.3 volts at the ESP8266 12E ADC pin, otherwise the ESP8266 12E burn out.
Components Required
0.96 OLED 4wire Module - 1no
Node MCU ESP8266 12E Dev Module- 1 no
Trim potentiometer 4.7K- 1 no
Jumper wires


Installing the library
To install the library navigate to the Sketch > Include Library > Manage Libraries… Wait for Library Manager to download libraries index and update list of installed libraries.
Download Adafruit_SSD1306_Library , we need to use this library for SSD1306 OLED display
Download Adafruit_GFX_Library , we need to use this library for Graphics
In your Arduino IDE, to install the libraries go to Sketch > Include Library > Add .ZIP library… and select the library you’ve just downloaded.
After installing the required libraries, copy the following code to your Arduino IDE.


arduino code
#include <ESP8266WiFi.h>
#include <ESP8266WebServer.h>
//WiFi Connection configuration
const char* ssid = "TP-Link_3200"; //YOUR SSID
const char* password = "95001121379884265554"; //YOUR WIFI PASSWORD
const char index_html[] PROGMEM={"<!DOCTYPE html>\n"
"<html>\n"
"<head>\n"
"<title>IOT Based Battery Level Monitor</title>\n"
"<head>\n"
"<body>\n"
"<h1>ESP8266 NodeMCU ADC and Fusion Chart </h1>"
"<body>\n"
"<script type=\"text/javascript\" src=\"http://static.fusioncharts.com/code/latest/fusioncharts.js\"></script>\n"
"<script type=\"text/javascript\" src=\"http://static.fusioncharts.com/code/latest/themes/fusioncharts.theme.fint.js\"></script>\n"
"<script src=\"https://cdnjs.cloudflare.com/ajax/libs/zepto/1.2.0/zepto.min.js\"></script>\n"
"<script type=\"text/javascript\">\n"
" FusionCharts.ready(function(){\n"
" var chartObj = new FusionCharts({\n"
" \"type\": \"hled\",\n"
" \"dataFormat\": \"json\",\n"
" \"renderAt\": \"chart-container\",\n"
" \"width\": \"500\",\n"
" \"height\": \"250\",\n"
" \"dataSource\": {\n"
" \"chart\": {\n"
" \"theme\": \"fusion\",\n"
" \"caption\": \"ADC Level LED Display\",\n"
" \"lowerLimit\": \"0\",\n"
" \"upperLimit\": \"100\",\n"
" \"lowerLimitDisplay\": \"Empty\",\n"
" \"upperLimitDisplay\": \"Full\",\n"
" \"numberSuffix\": \" % \",\n"
" \"valueFontSize\": \" 12 \",\n"
" \"showhovereffect\": \"1\",\n"
" \"origW\": \"500\",\n"
" \"origH\": \"250\",\n"
" \"ledSize\": \"4\",\n"
" \"ledGap\": \"0.5\",\n"
" \"manageResize\": \"1\",\n"
" \"theme\": \"fusion\"\n"
" },\n"
" \"annotations\": {\n"
" \"showbelow\": \"1\",\n"
" \"groups\": [{\n"
" \"id\": \"indicator\",\n"
" \"items\": [\n"
" {\n"
" \"id\": \"bgRectAngle\",\n"
" \"type\": \"rectangle\",\n"
" \"alpha\": \"90\",\n"
" \"radius\": \"1\",\n"
" \"fillColor\": \"#FFFFFF\",\n"
" \"x\": \"$gaugeCenterX - 40\",\n"
" \"tox\": \"$gaugeCenterX + 40\",\n"
" \"y\": \"$gaugeEndY + 25\",\n"
" \"toy\": \"$gaugeEndY + 45\"\n"
" }\n"
" ]\n"
" }]\n"
" },\n"
" \"colorRange\": {\n"
" \"color\": [{\n"
" \"minValue\": \"0\",\n"
" \"maxValue\": \"40\",\n"
" \"code\": \"#e44a00\"\n"
" }, {\n"
" \"minValue\": \"40\",\n"
" \"maxValue\": \"70\",\n"
" \"code\": \"#f8bd19\"\n"
" }, {\n"
" \"minValue\": \"70\",\n"
" \"maxValue\": \"100\",\n"
" \"code\": \"#6baa01\"\n"
" }]\n"
" },\n"
" \"value\": \"10\"\n"
" },\n"
" \"events\": {\n"
" \"rendered\": function(evtObj, argObj) {\n"
"\tsetInterval(function() {\n"
"\tvar someUrl = \"/level\";\n"
"\t\t\t\t\t$.ajax({\n"
"\t\t\t\t\t\turl: someUrl,\n"
"\t\t\t\t\t\tdataType: \"text\",\n"
"\t\t\t\t\t\tsuccess: function(response) {\n"
"\t\t\t\t\t\t\t evtObj.sender.feedData(\"&value=\" + response);\n"
"\t\t\t\t\t\t},\n"
"\t\t\t\t\t\ttimeout: 1000\n"
"\t\t\t\t\t})\t\n"
"\t\t\n"
" }, 1000); \n"
" }\n"
"}\n"
"});\n"
" chartObj.render();\n"
" });\n"
"</script>\n"
"</head>\n"
"<body>\n"
"<div style=\"width:600px;margin:auto;\">\n"
"\n"
" </main>\n"
" \n"
"</div>\n"
" <span style=\"margin-left: 10px;\" class=\"outline\" id=\"chart-container\">FusionCharts XT will load here!</span>\n"
" </div>\n"
"\n"
"\n"
"\t</body>\n"
"</html>"
};
#include <SPI.h>
#include <Wire.h>
#include <Adafruit_GFX.h>
#include <Adafruit_SSD1306.h>
#define SCREEN_WIDTH 128 // OLED display width, in pixels
#define SCREEN_HEIGHT 64 // OLED display height, in pixels
// Declaration for an SSD1306 display connected to I2C (SDA, SCL pins)
// The pins for I2C are defined by the Wire-library.
// On an arduino UNO: A4(SDA), A5(SCL)
// On an arduino MEGA 2560: 20(SDA), 21(SCL)
// On an arduino LEONARDO: 2(SDA), 3(SCL), ...
#define OLED_RESET -1 // Reset pin # (or -1 if sharing Arduino reset pin)
#define SCREEN_ADDRESS 0x3C ///< See datasheet for Address; 0x3D for 128x64, 0x3C for 128x32
Adafruit_SSD1306 display(SCREEN_WIDTH, SCREEN_HEIGHT, &Wire, OLED_RESET);
float analog_percentage = 0;
WiFiClient client;
ESP8266WebServer server(80);
void handleRoot() {
server.send_P(200, "text/html;charset=UTF-8", index_html);
}
void handleLevelRequest(){
int a = analogRead(A0);
a = map(a,0,1023,0,100);
String analog_percentage = String(a);
display.setCursor(0, 1);
display.setTextColor(WHITE);
display.setTextSize(1);
display.println("ADC Percentage:");
// on écrit la valeur numérique de la tension un peu plus bas, en plus gros
display.setCursor(35, 45);
display.setTextSize(2);
display.print(a/100);
if ((a % 100) < 10){
display.print("0");
}
display.print(a % 100);
display.println(" %");
display.fillRect( 5, 17, 120, 20, BLACK);
display.drawRect( 5, 17, 120, 20, WHITE);
display.fillRect( 7, 19, map(a, 0, 100, 0, 116), 16, WHITE);
display.display();
delay(500);
display.clearDisplay();
Serial.println(analog_percentage);
server.send(200,"text",String(analog_percentage));
}
void handleNotFound(){
String message = "File Not Found\n\n";
server.send(404, "text/plain", message);
}
void runPeriodicFunc()
{
static const unsigned long REFRESH_INTERVAL1 = 1000; // 2.1sec
static unsigned long lastRefreshTime1 = 0;
if(millis() - lastRefreshTime1 >= REFRESH_INTERVAL1)
{
lastRefreshTime1 = millis();
}
}
void setup(void){
Serial.begin(115200);
delay(100);
WiFi.begin(ssid, password);
Serial.println("");
while (WiFi.status() != WL_CONNECTED) {
delay(500);
Serial.print(".");
}
// SSD1306_SWITCHCAPVCC = generate display voltage from 3.3V internally
if(!display.begin(SSD1306_SWITCHCAPVCC, SCREEN_ADDRESS)) {
Serial.println(F("SSD1306 allocation failed"));
for(;;); // Don't proceed, loop forever
}
// Show initial display buffer contents on the screen --
// the library initializes this with an Adafruit splash screen.
display.display();
delay(2000); // Pause for 2 seconds
// Clear the buffer
display.clearDisplay();
// Draw a single pixel in white
display.drawPixel(10, 10, SSD1306_WHITE);
// Show the display buffer on the screen. You MUST call display() after
// drawing commands to make them visible on screen!
display.display();
delay(2000);
// display.display() is NOT necessary after every single drawing command,
// unless that's what you want...rather, you can batch up a bunch of
// drawing operations and then update the screen all at once by calling
// display.display(). These examples demonstrate both approaches...
// Invert and restore display, pausing in-between
display.invertDisplay(true);
delay(1000);
display.invertDisplay(false);
delay(1000);
Serial.print("IP address:");
Serial.println(WiFi.localIP());
server.on("/", handleRoot);
server.on("/level",handleLevelRequest);
server.onNotFound(handleNotFound);
server.begin();
Serial.println("HTTP server started");
}
void loop(void){
runPeriodicFunc();
server.handleClient();
}
After a successful upload, open the Serial Monitor at a baud rate of 152000. Press the “EN/RST” button on the ESP8266 board and see the result in serial monitor.


After that Open the web browser and enter the IP address and see the result.
Demo:


Comments