
Hand Gesture Controlled 2WD using Accelerometer, RF(433 Mhz ), Decoder and Encoder
- Ramesh G

- Feb 14, 2021
- 3 min read
Updated: Jul 2, 2021
A simple Arduino based RF controlled robot that can be driven remotely. The RF remote control provides the advantage of a good controlling range (up to 100 metres with proper antenna). In this project we have used hand motion to drive the robot. For this purpose we have used accelerometer (ADXL345) which works on acceleration.
A gesture controlled robot is controlled by using hand in place of any other method like buttons or joystick. Here one only needs to move hand to control the robot. A transmitting device is used in your hand which contains RF Transmitter and accelero-meter. This will transmit command to robot so that it can do the required task like moving forward, reverse, turning left, turning right and stop. All these tasks will be performed by using hand gesture.
Here the most important component is accelerometer. Accelerometer is a 3 axis acceleration measurement device with +-3g range. This device is made by using polysilicon surface sensor and signal conditioning circuit to measure acceleration. The output of this device is Analog in nature and proportional to the acceleration. This device measures the static acceleration of gravity when we tilt it. And gives an result in form of motion or vibration.

Components Required
433 MHz RF Transmitter and Receiver Module
HT12D Decoder Module
HT12E EncoderModule
Push Buttons (4 Nos)
4 Channel Relay Module
Arduino Uno
ADXL345
ADXL345 Tripple Axis Accelerometer Board is a small, thin, low power, 3-axis accelerometer with high resolution (13-bit) measurement at up to ±16g. Digital output data is format as 16-bit twos complement and is accessible through either an SPI (3- or 4-wire) or I2C digital interface.
The ADXL345 Tripple Axis Accelerometer Board is well suited for mobile device applications. It measures the static acceleration of gravity in tilt-sensing applications, as well as dynamic acceleration resulting from motion or shock. Its high resolution (4 mg/LSB) enables measurement of inclination changes less than 1.0°.
Features :
Ultra-Low Power: 40µA in measurement mode, 0.1µA in standby@ 2.5V.
Free-Fall Detection.
Tap/Double Tap Detection.
Flexible interrupt modes mappable to either interrupt pin Measurement ranges selectable via serial command Bandwidth selectable via serial command
Wide temperature range (−40°C to +85°C).
10,000 g shock survival.
Support 5V/3.3V voltage input, onboard RT9161 power chip, lower pressure drop faster than 1117, the faster load speed of response, very suitable for high-noise power supply environment.
User-selectable resolution
Fixed 10-bit resolution.
Full resolution, where resolution increases with G range, up to 13-bit resolution at ±16 g (maintaining 4 mg/LSB scale factor in all G ranges).
Explanation
Gesture Controlled Robot is divided into two sections:
Transmitter part
Receiver part
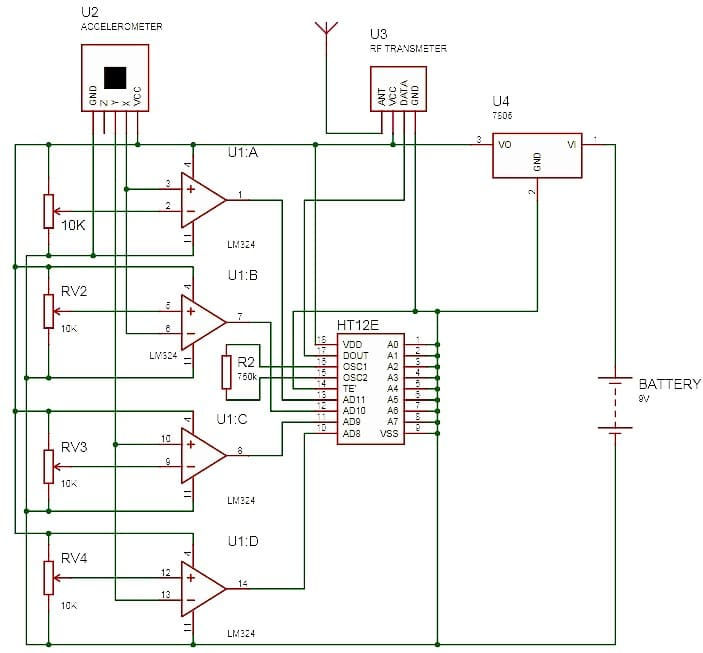
In transmitter part an accelerometer and a RF transmitter unit is used. As we have already discussed that accelerometer gives an analog output so here we need to convert this analog data in to digital. For this purpose we have used 4 channel comparator circuit in place of any ADC. By setting reference voltage we gets a digital signal and then apply this signal to HT12E encoder to encode data or converting it into serial form and then send this data by using RF transmitter into the environment.
At the receiver end we have used RF receiver to receive data and then applied to HT12D decoder. This decoder IC converts received serial data to parallel and then read by using arduino. According to received data we drive robot by using two DC motor in forward, reverse, left, right and stop direction.
operation
Gesture controlled robot moves according to hand movement as we place transmitter in our hand. When we tilt hand in front side, robot start to moving forward and continues moving forward until next command is given.
When we tilt hand in backward side, robot change its state and start moving in backwards direction until other command is given.
When we tilt it in left side Robot get turn left till next command.
When we tilt hand in right side robot turned to right.
And for stopping robot we keeps hand in stable.
Circuit Connection
Transmitter circuit
Receiver circuit
Arduino Pin D2 to D5 are Connected to AD8 through AD11 of Decoder HT12D Module.
Arduino Pin D8 and D9 are Connected to Left Motor
Arduino Pin D10 and D11 are Connected to Right Motor


Subscribe and Download code.
Arduino Code:
//RF Robot
int sw1 =2;
int sw2 =3;
int sw3 =4;
int sw4 =5;
int out1=8;
int out2=9;
int out3=10;
int out4=11;
void setup()
{
pinMode(sw1,INPUT);
pinMode(sw2,INPUT);
pinMode(sw3,INPUT);
pinMode(sw4,INPUT);
pinMode(out1,OUTPUT);
pinMode(out2,OUTPUT);
pinMode(out3,OUTPUT);
pinMode(out4,OUTPUT);
}
void loop()
{
if ((digitalRead(sw1)==LOW) && (digitalRead(sw2)==HIGH) && (digitalRead(sw3)==HIGH) && (digitalRead(sw4)==HIGH))
{
fwd();
}
else if ((digitalRead(sw1)==HIGH) && (digitalRead(sw2)==LOW) && (digitalRead(sw3)==HIGH) && (digitalRead(sw4)==HIGH))
{
bwk();
}
else if ((digitalRead(sw1)==HIGH) && (digitalRead(sw2)==HIGH) && (digitalRead(sw3)==LOW) && (digitalRead(sw4)==HIGH))
{
lft();
}
else if ((digitalRead(sw1)==HIGH) && (digitalRead(sw2)==HIGH) && (digitalRead(sw3)==HIGH) && (digitalRead(sw4)==LOW))
{
rgt();
}
else
{ digitalWrite(out1,LOW);
digitalWrite(out2,LOW);
digitalWrite(out3,LOW);
digitalWrite(out4,LOW);
}
}
void fwd()
{ digitalWrite(out1,HIGH);
digitalWrite(out2,LOW);
digitalWrite(out3,HIGH);
digitalWrite(out4,LOW);
}
void bwk()
{ digitalWrite(out1,LOW);
digitalWrite(out2,HIGH);
digitalWrite(out3,LOW);
digitalWrite(out4,HIGH);
}
void lft()
{ digitalWrite(out1,HIGH);
digitalWrite(out2,LOW);
digitalWrite(out3,LOW);
digitalWrite(out4,LOW);
}
void rgt()
{ digitalWrite(out1,LOW);
digitalWrite(out2,LOW);
digitalWrite(out3,HIGH);
digitalWrite(out4,LOW);
}


Comments