
IoT Based Battery Voltage Level Monitoring using TP-4056 and Thingspeak
- Ramesh G

- May 31, 2021
- 4 min read

In this tutorial we learn Battery voltage monitor for solar panel Circuit, Car, Electronic Device etc. The measuring voltage of your solar panel battery, ups and other daily use batteries consumes a lot of time and Battery maintenance is also important. So that we make An IoT Based Battery Voltage Monitoring using Thingspeak Iot Platform.
Battery is the most important component for any device as it powers the whole system. And it is important to monitor the voltage level of the battery as improper charging and discharging of a lithium battery may lead to a big safety issue. In this project, we will also build an IoT based Battery Monitoring System includes monitor the volts and Level status of the battery and data stores in IoT cloud.
Circuit diagram

Components Required
ESP 12E NodeMCU - 1 no
LiPo Charger (TP4056) - 1no
Resistors 100K - 2nos
Lithium Polymer Battery - 1no
Solar Panel 5V - 1 no (Optional) or Micro USB charger 5V

NodeMCU
NodeMCU ESP8266-12E MCU is a development board with one analogue and many general-purpose input output (GPIO) pins. It has 4MB flash memory, and can operate at a default clock frequency of 80MHz. In this project, Analogl pin A0 of NodeMCU is used to read Data of Battery Voltage.
Lithium-ion
A lithium-ion battery or Li-ion battery is a type of rechargeable battery. Lithium-ion batteries are commonly used for portable electronics and electric vehicles.
In this battery, lithium ions move from the negative electrode through an electrolyte to the positive electrode during discharge, and back when charging. The batteries have a high energy density, no memory effect and low self-discharge.
Nominal, Maximum & Cut-off Voltage
These are the few Lithium-Ion batteries that I have been using for very long for many of my projects. Some of the batteries has a simple attached Battery Management System Circuit for over-voltage protection, balanced charging, short-circuit protection etc.
Most of the Lithium-Ion batteries have a nominal voltage of 3.7V. When the battery charges to full the maximum voltage are 4.2±0.5. If you see the manufacturer datasheet then it is clearly mentioned that the cut-off voltage is 3V and varies depending upon the battery type and applications. The battery I am using has a discharge cut-off voltage of 2.8V. You can also get some batteries with cut-off voltage of 2.5V.
Voltage Divider Network Calculations

The Battery Maximum voltage is 4.2V and the cut of voltage is 2.8V. Anything lesser than 3.3V will be easily supported by ESP12E Analog Pin A0.
We have to first step down the upper voltage level. The source voltage is 4.2V and there is a pair of 100K resistors. This will give an output of 2.1V. Similarly, the minimum voltage is 2.8V as a cutoff voltage which steps down to 1.4V using the same voltage divider network. Hence, both the upper and lower voltage is supported by ESP12E Analog Pin.
TP4056

This TP4056 1A Li-ion Lithium Battery Charging Module with Current Protection – Mini USB is a tiny module, perfect for charging single cell 3.7V 1 Ah or higher lithium ion (Li-Ion) cells such as 16550s that don’t have their own protection circuit. Based on the TP4056 charger IC and DW01 battery protection IC this module will offer 1A charge current then cut off when finished.
The TP4056 is a complete constant-current/constant-voltage linear charger for single cell lithium-ion batteries. Its SOP package and low external component count make the TP4056 ideally suited for portable applications. Furthermore, the TP4056 can work within USB and wall adapter.
Download Datasheet.
Module Usage
Connect mini USB cable for power, or 5V DC to pads marked IN+ and IN- on the left-hand side of the module
Connect cell to charge to B+/B- pads on the right-hand side of the module.
A load (something for the battery to power) can be connected to the OUT+/OUT- pads on the right-hand side
Important! Disconnect load when charging
The red LED indicates charging in progress, a green LED indicates charging has finished.
Never charge your battery at a rate greater than 1C.
Note:
Ampere meter can only be connected to a 5v input end of the module. It is better than the charging current is 37% of the battery capacity. If you charge the battery of 1000mAh, a current of 400mAh is enough. The connection wire should not be too thick. Make sure the connect point is good. If the input voltage is too high, like 5.2v, the current will be less than 1000mA, it is normal. It is protection function, auto-subtract the charging current to avoid burn damage to the chip. NO Reverse polarity.
Thingspeak
ThingSpeak is an IoT analytics platform service that allows you to aggregate, visualize, and analyze live data streams in the cloud. You can send data to ThingSpeak from your devices, create instant visualization of live data, and send alerts.
https://thingspeak.com/ Create an account or simply sign in if you created the account earlier. Then create a new channel.

Arduino code
Subscribe and Get code.

#include <ESP8266WiFi.h>
//SSID and Password of your WiFi router
const char* ssid = "xxxxxxxxxx"; // replace with your SSID
const char* password = "xxxxxxxxxxxxxx"; // Replace with Wifi Password
String apiKey = "xxxxxxxxxxxxxxxxx";
const char* server = "api.thingspeak.com";
int analogInPin = A0; // Analog input pin
int sensorValue; // Analog Output of Sensor
float calibration = 0.05; // Accuracy
int bat_percentage;
WiFiClient client;
void setup()
{
Serial.begin(115200);
Serial.println("Connecting to ");
Serial.println(ssid);
WiFi.begin(ssid, password);
while (WiFi.status() != WL_CONNECTED)
{
delay(100);
Serial.print("*");
}
Serial.println("");
Serial.println("WiFi connected");
}
void loop()
{
sensorValue = analogRead(analogInPin);
float voltage = (((sensorValue * 3.3) / 1024) * 2 + calibration); //multiply by two as voltage divider network is 100K & 100K Resistor
bat_percentage = mapfloat(voltage, 2.8, 4.2, 0, 100); //2.8V as Battery Cut off Voltage & 4.2V as Maximum Voltage
if (bat_percentage >= 100)
{
bat_percentage = 100;
}
if (bat_percentage <= 0)
{
bat_percentage = 1;
}
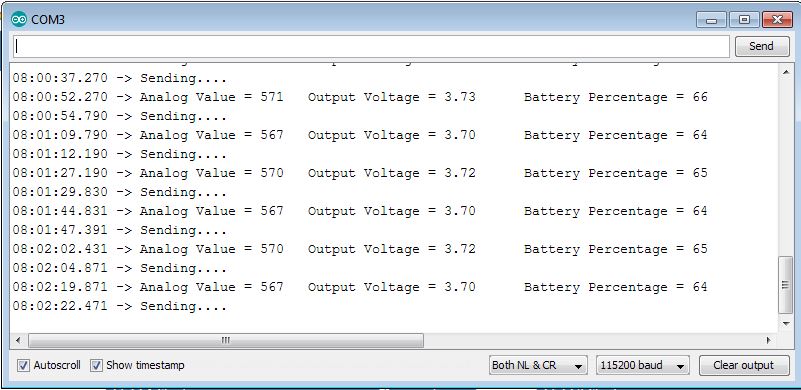
Serial.print("Analog Value = ");
Serial.print(sensorValue);
Serial.print("\t Output Voltage = ");
Serial.print(voltage);
Serial.print("\t Battery Percentage = ");
Serial.println(bat_percentage);
delay(1000);
if (client.connect(server, 80))
{
String postStr = apiKey;
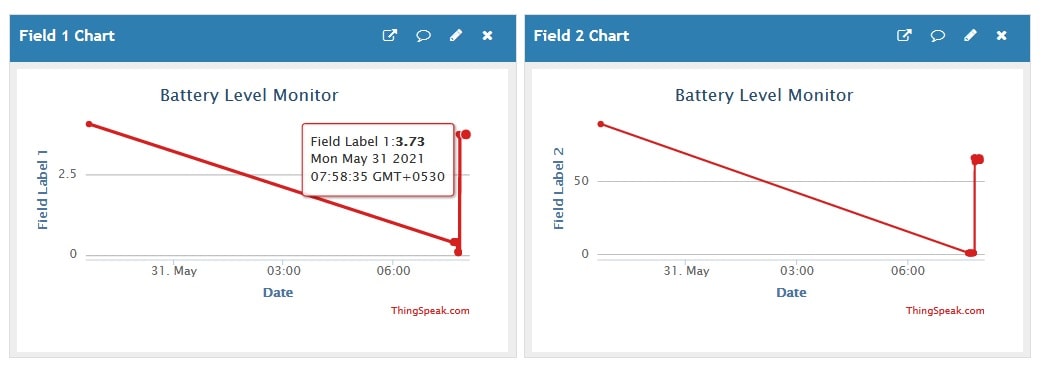
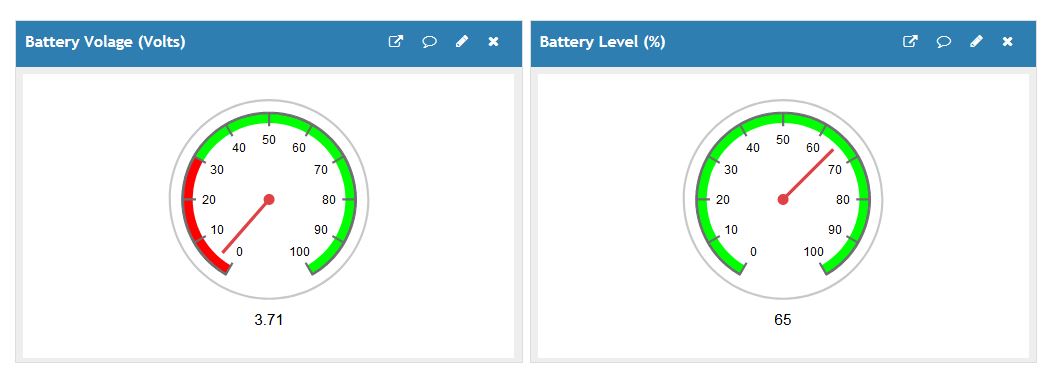
postStr += "&field1=";
postStr += String(voltage);
postStr += "&field2=";
postStr += String(bat_percentage);
postStr += "\r\n\r\n";
client.print("POST /update HTTP/1.1\n");
delay(100);
client.print("Host: api.thingspeak.com\n");
delay(100);
client.print("Connection: close\n");
delay(100);
client.print("X-THINGSPEAKAPIKEY: " + apiKey + "\n");
delay(100);
client.print("Content-Type: application/x-www-form-urlencoded\n");
delay(100);
client.print("Content-Length: ");
delay(100);
client.print(postStr.length());
delay(100);
client.print("\n\n");
delay(100);
client.print(postStr);
delay(100);
}
client.stop();
Serial.println("Sending....");
delay(15000);
}
float mapfloat(float x, float in_min, float in_max, float out_min, float out_max)
{
return (x - in_min) * (out_max - out_min) / (in_max - in_min) + out_min;
}
Then, upload the code to your NodeMCU board. Make sure you have selected the right board and COM port. Also, make sure you’ve inserted your WiFi Credentials in the code.
After a successful upload, open the Serial Monitor at a baud rate of 115200. Press the “EN/RST” button on the ESP8266 board.


Comments