
NodeMCU Web Server Controlled Servo Motor Using Angular Slider
- Ramesh G

- Nov 20, 2022
- 3 min read

In this tutorial, we will explore to control the Pan & Tilt servo using ESP8266 web server angular slider. The servo position can vary from 0 to 180 degree and can be controlled through a Web Page slider. When this web page is accessed from a computer or mobile phone that is connected to the same WiFi Network as the ESP8266, you can control the position of the Servo Motor by adjusting the slider.
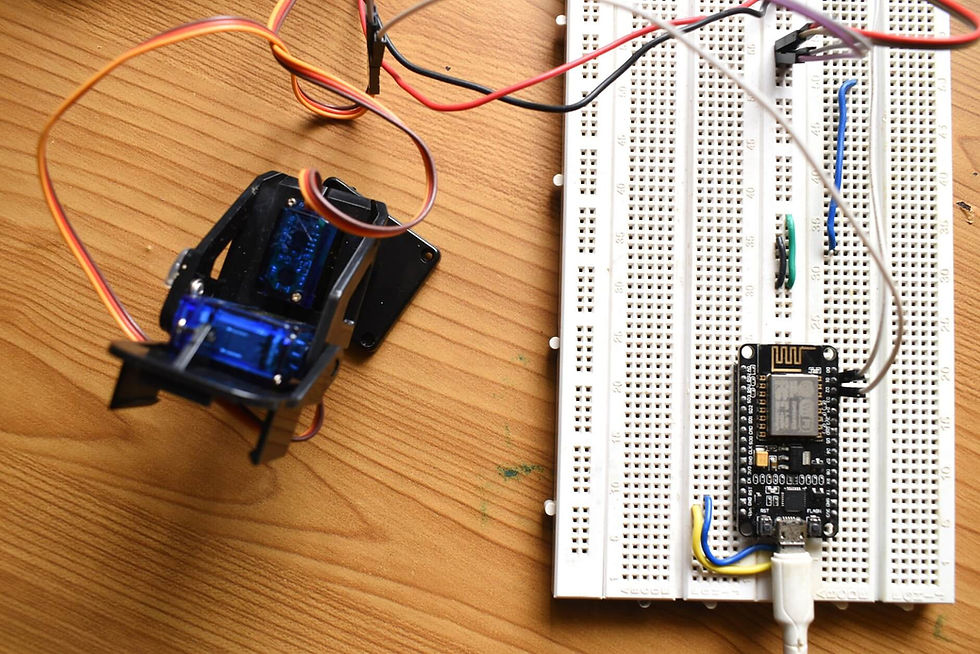
Circuit Diagram

Components Required
ESP8266 12E
Servo Motor SG90 or MG90S
Pan tilt Servo Bracket


Installing Library
you need to add Servo.h and FS.h from library.
After installing the required libraries, copy the following code to your Arduino IDE.
Finally, to build the web server we need two different files. One is The Arduino sketch and the other is an HTML file. So, the HTML file should be saved inside a folder called data. It resides inside the Arduino sketch folder, as shown below:
Create an index.html file with the following content.
The index.html file will contain web pages that will be displayed by the server along with JavaScript that will process the formation of graphics. While all server programs and sensor readings are in the .ino file.

arduino code
#include <ESP8266WiFi.h>
#include <ESP8266WebServer.h>
#include <FS.h> //Include File System Headers
#include <Servo.h>
const char* htmlfile = "/index.html";
// Replace with your network credentials
const char* ssid = "TP-Link_3200"; // your SSID
const char* password = "95001121379884265554"; // Your Wifi password
#define ServoPin 5 //D1
#define Servo2Pin 4 //D2
int pos = 100;
int pos2 = 100;
Servo myservo; // create servo object to control a servo
Servo myservo2; // create servo object to control a servo
ESP8266WebServer server(80);
void handlePOS(){
String POS = server.arg("ppos");
int pos = POS.toInt();
myservo.write(pos); // tell servo to go to position in variable 'pos'
delay(15);
Serial.println("Pan Servo:");
Serial.println(pos);
server.send(200, "text/plane","");
}
void handlePOS2(){
String POS2 = server.arg("tpos");
int pos2 = POS2.toInt();
myservo2.write(pos2); // tell servo to go to position in variable 'pos'
delay(15);
Serial.println("Tilt Servo:");
Serial.println(pos2);
server.send(200, "text/plane","");
}
void handleRoot(){
server.sendHeader("Location", "/index.html",true); //Redirect to our html web page
server.send(302, "text/plane","");
}
void handleWebRequests(){
if(loadFromSpiffs(server.uri())) return;
String message = "File Not Detected\n\n";
message += "URI: ";
message += server.uri();
message += "\nMethod: ";
message += (server.method() == HTTP_GET)?"GET":"POST";
message += "\nArguments: ";
message += server.args();
message += "\n";
for (uint8_t i=0; i<server.args(); i++){
message += " NAME:"+server.argName(i) + "\n VALUE:" + server.arg(i) + "\n";
}
server.send(404, "text/plain", message);
Serial.println(message);
}
void setup() {
delay(1000);
Serial.begin(115200);
Serial.println();
myservo.attach(ServoPin); // attaches the servo on GIO2 to the servo object
myservo2.attach(Servo2Pin); // attaches the servo on GIO2 to the servo object
//Initialize File System
SPIFFS.begin();
Serial.println("File System Initialized");
//Connect to wifi Network
WiFi.begin(ssid, password); //Connect to your WiFi router
Serial.println("");
// Wait for connection
while (WiFi.status() != WL_CONNECTED) {
delay(500);
Serial.print(".");
}
//If connection successful show IP address in serial monitor
Serial.println("");
Serial.print("Connected to ");
Serial.println(ssid);
Serial.print("IP address: ");
Serial.println(WiFi.localIP()); //IP address assigned to your ESP
//Initialize Webserver
server.on("/",handleRoot);
server.on("/setPAN",handlePOS); //Reads from out index.html
server.on("/setTILT",handlePOS2); //Reads from out index.html
server.onNotFound(handleWebRequests); //Set setver all paths are not found so we can handle as per URI
server.begin();
}
void loop() {
server.handleClient();
}
bool loadFromSpiffs(String path){
String dataType = "text/plain";
if(path.endsWith("/")) path += "index.htm";
if(path.endsWith(".src")) path = path.substring(0, path.lastIndexOf("."));
else if(path.endsWith(".html")) dataType = "text/html";
else if(path.endsWith(".htm")) dataType = "text/html";
else if(path.endsWith(".css")) dataType = "text/css";
else if(path.endsWith(".js")) dataType = "application/javascript";
else if(path.endsWith(".png")) dataType = "image/png";
else if(path.endsWith(".gif")) dataType = "image/gif";
else if(path.endsWith(".jpg")) dataType = "image/jpeg";
else if(path.endsWith(".ico")) dataType = "image/x-icon";
else if(path.endsWith(".xml")) dataType = "text/xml";
else if(path.endsWith(".pdf")) dataType = "application/pdf";
else if(path.endsWith(".zip")) dataType = "application/zip";
File dataFile = SPIFFS.open(path.c_str(), "r");
if (server.hasArg("download")) dataType = "application/octet-stream";
if (server.streamFile(dataFile, dataType) != dataFile.size()) {
}
dataFile.close();
return true;
}
Then, upload the code to your NodeMCU board. Make sure you have selected the right board and COM port. Also, make sure you’ve inserted your WiFi Credentials in the code
After a successful upload, open the Serial Monitor at a baud rate of 115200. Press the “EN/RST” button on the ESP8266 board. Now it should print its IP address

After that Open the web browser and enter the IP address path.

Demo:


[index.html] is being hidden by Chrome when view frame source, is it possible to provide a link for download?