
IoT Based Servo Control using MQTT
- Ramesh G

- Jan 13, 2021
- 3 min read
Updated: Feb 2, 2021
Here to learn how to build an IoT system using ESP8266, myDevices Cayenne, and MQTT. In more detail, this IoT tutorial discovers how to use an ESP8266 to send data to Cayenne using the MQTT protocol. Moreover, this ESP8266 MQTT project investigates how to use MQTT to control remote peripheral devices using a web interface. This is a complete step-by-step tutorial on building an IoT system using Cayenne and ESP.
On the other hand, Cayenne is an IoT cloud platform that provides several cloud services, such as:
Data visualization
IoT cloud
Alerts
Scheduling Events
We will focus our attention on data visualization and on the IoT cloud services.

Cayenne
Cayenne IoT Platform accelerates the development of IoT-based solutions, including quick design, prototyping and other commercialized projects. It is a drag-and-drop IoT project builder that can help developers build complete, ready-to-use IoT solutions with little to no coding.
Cayenne IoT Platform contains a vast catalog of certified IoT-ready devices and connectivity options. This allows users to easily add any device to the library utilizing MQTT API. All devices in Cayenne are interoperable and benefit from features such as rules engine, asset tracking, remote monitoring and control, and tools to visualize real-time and historical data.
MQTT is a lightweight messaging protocol for sensors and mobile devices.
NodeMCU
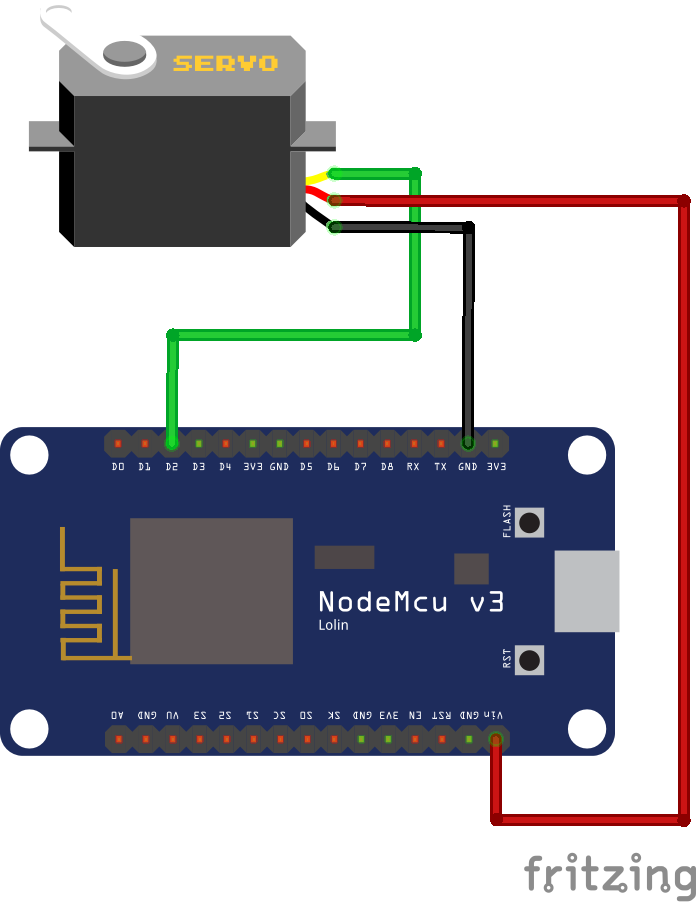
NodeMCU ESP8266-12E MCU is a development board with one analogue and many general-purpose input output (GPIO) pins. It has 4MB flash memory, and can operate at a default clock frequency of 80MHz. In this project, digital pin D2 of NodeMCU is used to Signal Pin of Servo Motor.
Servo Motor SG-90
A servo motor is a closed-loop system that uses position feedback to control its motion and final position.RC servo motor works on the same principal. It contains a small DC motor connected to the output shaft through the gears.
A servo motor is controlled by sending a series of pulses through the signal line. The frequency of the control signal should be 50Hz or a pulse should occur every 20ms. The width of pulse determines angular position of the servo and these type of servos can usually rotate 180 degrees
The control wire is used to communicate the angle. The angle is determined by the duration of a pulse that is applied to the control wire. This is called Pulse Coded Modulation. The servo expects to see a pulse every 20 milliseconds (.02 seconds). The length of the pulse will determine how far the motor turns. A 1.5 millisecond pulse, for example, will make the motor turn to the 90-degree position (often called as the neutral position). If the pulse is shorter than 1.5 milliseconds, then the motor will turn the shaft closer to 0 degrees. If the pulse is longer than 1.5 milliseconds, the shaft turns closer to 180 degrees.
Black wire of servo motor to the GND pin of NodeMCU
Red wire of servo motor to the 5V pin of NodeMCU
Yellow wire of servo motor to the Gpio 4 of NodeMCU

Installing the ESP8266_Arduino_Library
The ESP32 Arduino Servo Library makes it easier to control a servo motor with your ESP8266, using the Arduino IDE. Follow the next steps to install the library in your Arduino IDE:
Download the ESP32_Arduino_Servo_Library. You should have a .zip folder in your Downloads folder, Unzip the .zip folder and you should get ESP32-Arduino-Servo-Library.
Download the Cayenne-MQTT-ESP-master library from this link.
Click on Add ZIP Library and add Cayenne-MQTT-ESP-master zip file, or directly copy the folder (Cayenne-MQTT-ESP-master) and paste it in Libraries folder of Arduino IDE.
After installing the library, go to your Arduino IDE. Make sure you have the Nodemcu 1.0 ESP-12E board selected, and then, Copy and Paste code in Arduino IDE.
Circuit Diagram
Arduino code
#include <Servo.h>
#include <CayenneMQTTESP8266.h>
#include <ESP8266WiFi.h>
char ssid[] = "TP-Link_3200"; // YOUR SSID
char password[]="9500112137"; // YOUR PASSWORD
char username[] = "2031dd30-5414-11eb-b767-3f1a8f1211ba"; //yours
char mqtt_password[] = "f2ce829d98df3a768328ac6936eae9fd47d28289"; // yours
char client_id[] = "86da2870-54b5-11eb-883c-638d8ce4c23d"; //yours
Servo myservo;
void setup()
{
myservo.attach(D2);
Cayenne.begin(username,mqtt_password,client_id,ssid,password);
}
void loop()
{
Cayenne.loop();
}
CAYENNE_IN(1)
{
myservo.write(getValue.asInt());
}
Hardware interfacing with Cayenne IoT platform
Click on Add new and then Device/Widget in Settings, Add New Device here and select Slider for Controlling Servo 0 to 180 angle by step 1 angle to desired step value.
Configure device Generic ESP8266, MQTT username, password and client ID from Create App
Paste these respective details under username, password and client ID in Arduino source code , along with your Wi-Fi name and password.
After successfully compiling and uploading the code to NodeMCU, You will see ESP8266 connected to Wi-Fi. After the connection is established, the previous page is automatically updated on Cayenne. A new dashboard opens in the browser. Cayenne generates an ID and a device icon for your device.
Click on Custom Widgets and then value, and populate all fields . The channel number should be 1. (Make sure the channel number is same as in code.) Now, click on Add Widget.


Comments